1. X-Linux-AI Overview
X-LINUX-AI is the STM32 MPU OpenSTLinux extension package, designed for Artificial Intelligence on STM32MP1 and STM32MP2 series microprocessors. It contains Linux® AI framework and application examples to get started with some basic use cases.
The examples provided in X-LINUX-AI include a range of optimized models for image classification, object detection, semantic segmentation, and human pose estimation. The face recognition application provided as a pre-built binary in X-LINUX-AI is based on an STMicroelectronics retrained model.
The examples rely on STAI_MPU API, which supports TensorFlow™ Lite inference engine, the ONNX runtime, OpenVX™, or Google Edge TPU™ accelerators. They are compatible with Python™ scripts and C/C++ applications. This article will demonstrate these example demos using MYIR’s MYD-LD25X Development Board.
1.1 Hardware Resources
- MYD-LD25X development board with burned-in MYiR release image
- MY-LVDS070C LCD Module or any HDMI interface monitor
- MY-CAM003M MIPI Camera Module
.png)
MYD-LD25X Development Board
1.2 Software Resources
All operations described in this article are performed on the debugging serial port of the MYD-LD25X development board. Please make sure that you have completed the basic operations of the MYD-LD25X Quick Start Guide (come along with the board), and make sure that the board is connected to the Internet. There are various ways to provide a network connection, such as a router that can connect to the Internet or Wifi. For specific Wifi connection methods, you can refer to the WiFi STA Connection in the MYD-LD25X Linux Software Evaluation Guide document.
2. Installation of X-Linux-AI on Development Board
This chapter mainly introduces how to install X-Linux-AI and related demo components on the MYD-LD25X development board.
2.1 Preparation Environment
2.1.1 Obtaining Calibration Parameters
If you use LVDS display for the first time with MYD-LD25X and enter weston, you need to calibrate the display, and the automation script operation for calibration will be added to the autorun script by default. If you have already performed the calibration operation or use HDMI display, you can skip the content of this subsection.
Run the autorun.sh script to execute the calibration operation:
# autorun.sh
After the execution of the lvds display will appear touch points, click on this to complete the calibration, and then you do not need to calibrate again when using the display afterward.
2.1.2 Turn off the HMI
To avoid display conflicts, after logging in to the MYD-LD25X, do the following to close the mxapp2 program, which is the HMI interface of MYIR:
# killall mxapp2
And comment out the line in the autorun script that starts mxapp2 so that it doesn't run automatically after the next startup:
# vi /usr/bin/autorun.sh
#!/bin/sh
...Omit
sync
#/usr/sbin/mxapp2 &
2.1.3 Updating the Software Sources
Execute the following command to update the software sources:
# apt update
The software package is provided AS IS, and by downloading it, you agree to be bound to the terms of the software license agreement (SLA).
The detailed content licenses can be found at https://wiki.st.com/stm32mpu/wiki/OpenSTLinux_licenses.
Get:1 http://packages.openstlinux.st.com/5.1 mickledore InRelease [5,723 B]
Get:2 http://packages.openstlinux.st.com/5.1 mickledore/main arm64 Packages [725 kB]
Get:3 http://packages.openstlinux.st.com/5.1 mickledore/updates arm64 Packages [38.2 kB]
Get:4 http://packages.openstlinux.st.com/5.1 mickledore/untested arm64 Packages [1,338 kB]
Fetched 2,107 kB in 3s (690 kB/s)
Reading package lists... Done
Building dependency tree... Done
1 package can be upgraded. Run 'apt list --upgradable' to see it.
Updating the sources requires the MYD-LD25X to be connected to the Internet, so please make sure the network is smooth. When executing the above commands, the following problems may occur resulting in update errors:
- Synchronizing Timing Issues
E: Release file for http://packages.openstlinux.st.com/5.1/dists/mickledore/InRelease is not valid yet (invalid for another 1383d 8h 14min 14s). Updates for this repository will not be applied.
E: Release file for http://extra.packages.openstlinux.st.com/AI/5.1/dists/mickledore/InRelease is not valid yet (invalid for another 1381d 8h 10min 47s). Updates for this repository will not be applied.
The reason for the above problem is that the current development board's time has not been successfully synchronized with the network time. Perform the following operations to synchronize the network time, firstly, modify the timesyncd.conf configuration file, add the FallbackNTP Timing Center website, and modify it as shown below:
# vi /etc/systemd/timesyncd.conf
...
[Time]
#NTP=
FallbackNTP=ntp.ntsc.ac.cn cn.ntp.org.cn
...
Then enter the following command to restart the synchronized time service:
# systemctl restart systemd-timesyncd
Enter date again to see if the time is successfully updated, according to different network conditions, some situations may require some time to synchronize:
# date
2023年 03月 03日 星期五 17:50:37 CST
# date
2024年 09月 20日 星期五 15:45:15 CST
- DNS Issues
The following issues may occur after running apt update:
# apt update
...
Err:1 http://packages.openstlinux.st.com/5.1 mickledore InRelease
Temporary failure resolving 'packages.openstlinux.st.com'
Reading package lists... Done
Building dependency tree... Done
All packages are up to date.
W: Failed to fetch http://packages.openstlinux.st.com/5.1/dists/mickledore/InRelease Temporary failure resolving 'packages.openstlinux.st.com'
W: Some index files failed to download. They have been ignored, or old ones used instead.
This issue requires modifying /etc/resolve.conf by adding the following to the file:
# vi /etc/resolv.conf
...
nameserver 8.8.8.8
nameserver 8.8.4.4
2.2 Installing x-linux-ai-tool
When the environment configuration is complete, enter the following command to install x-linux-ai-tool:
# apt-get install -y x-linux-ai-tool
After the installation is complete, enter the following command to confirm that the installation is complete:
# x-linux-ai -v
X-LINUX-AI version: v5.1.0
For more information on using the x-linux-ai tool, check out x-linux-ai -h or browse the official wiki:
X-LINUX-AI Tool - stm32mpu
2.3 Installing the X-LINUX-AI Demo Package
To get started with X-linux-ai, you need to install the X-linux-ai demo package, which provides all of the Ai frameworks, sample applications, tools, and utilities optimized for the specific goals used:
# x-linux-ai -i packagegroup-x-linux-ai-demo
2.4 Running the Demo Launcher
ST's official demo launcher has been removed by default in MYD-LD25X, in order to facilitate the use of X-linu-ai's demo application, it is necessary to re-add the official demo display program that comes with weston's self-startup.
Enter the /usr/local/weston-start-at-startup directory and create a new start_up_demo_launcher.sh script, add the corresponding content to the script as follows:
# cd /usr/local/weston-start-at-startup
# vi start_up_demo_launcher.sh
#!/bin/sh
DEFAULT_DEMO_APPLICATION_GTK=/usr/local/demo/launch-demo-gtk.sh
if [ -e /etc/default/demo-launcher ]; then
source /etc/default/demo-launcher
if [ ! -z "$DEFAULT_DEMO_APPLICATION" ]; then
$DEFAULT_DEMO_APPLICATION
else
$DEFAULT_DEMO_APPLICATION_GTK
fi
else
$DEFAULT_DEMO_APPLICATION_GTK
fi
Then add run permissions to the script:
# chmod a+x start_up_demo_launcher.sh
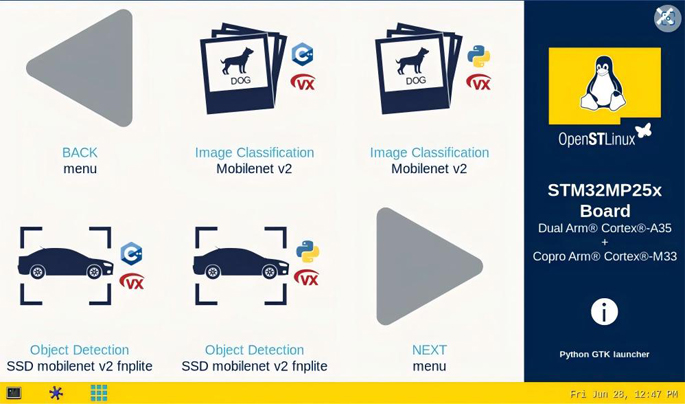
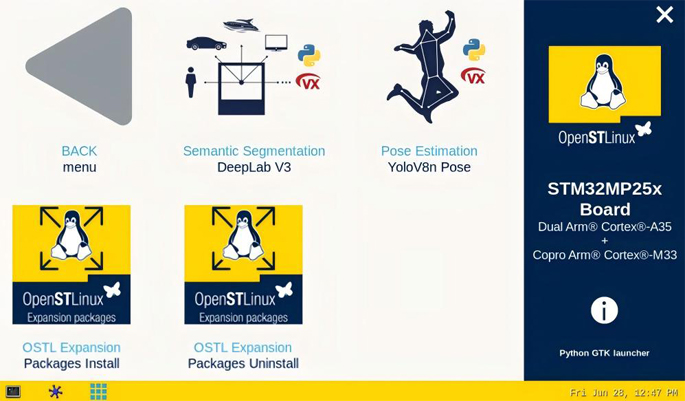
Finally after restarting the weston service, you can see that the launcher is running successfully:
# systemctl restart weston-graphical-session.service

Demo Launcher-1

Demo Launcher-2
3. Running the AI Application Example
This section will briefly show a few demo specifics after the installation above. Before executing the demos, you need to prepare the hardware resources in subsection 1.1.
The following demos all need to use the MIPI-CSI camera, and the camera applied to the MYD-LD25X development board is MYIR's MY-CAM003M, you need to follow the following commands to initialize the configuration and preview to ensure that the camera works properly before using it.
Enter the /etc/myir_test directory and run the myir_camera_play script:
# cd /etc/myir_test
# ./myir_camera_play
After execution, the camera preview screen will appear on the screen, please make sure the screen is displayed normally, if there is a problem, please refer to the MYD-LD25X Linux Software Evaluation Guide about MIPI-CSI Camera section to check the camera connection and other information to troubleshoot the problem, please consult with MYIR technical support if needed.
3.1 Image Classification
The image classification neural network model can recognize the object represented by an image. It categorizes images into different classes. The application demonstrates a computer vision use case for image classification, where frames are captured from the camera input (/dev/videox) and analyzed by a neural network model parsed by OpenVX, TFLite or ONNX frameworks.
3.1.1 Running through the Demo Launcher
The demo can be run by clicking on the Image Classifiction sample icon in the demo launcher. By default, the OpenVX application is installed via subsection 2.3 and is available in both C/C++ and Python.
.jpg)
Image Classification
3.1.2 Running the Command
The C/C++ and Python applications for image classification are located in the /usr/local/x-linux-ai/image-classification/ directory, and can be run with the -h argument for more helpful information:
# cd /usr/local/x-linux-ai/image-classification
/# ls -la
stai_mpu_image_classification #C++运行程序
stai_mpu_image_classification.py #Python运行程序
To simplify the startup of the demo, there are configured startup scripts in the application directory:
l Starting the image classification demo using camera input
launch_bin_image_classification.sh #C++运行程序
launch_python_image_classification.sh #Python运行程序
l Starting the image classification demo using image input
launch_bin_image_classification_testdata.sh #C++运行程序
launch_python_image_classification_testdata.sh #Python运行程序
3.1.3 Demo Showcase
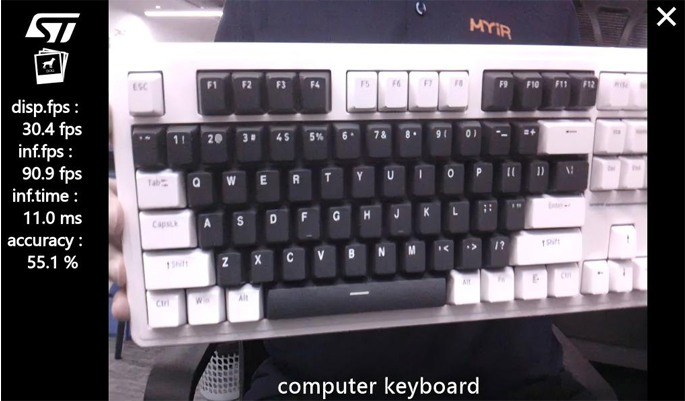
Starting through the demo launcher defaults to using the camera input, which is consistent with the results of scripts using the camera input in the command launcher. Here is an example of a C/C++ program with the following specific testing conditions:
# cd /usr/local/x-linux-ai/image-classification
# ./launch_bin_image_classification.sh #或者点击demo启动器图标

Camera Input
Before running the script for image input, you need to prepare the recognized image. Here take a teddy bear image as an example, the image is placed in the directory/usr/local/x-linux-ai/image-classification/models/mobilenet/testdata, and then run the script, here take the C/C++ application as an example.
# cd /usr/local/x-linux-ai/image-classification/models/mobilenet/testdata
# ls -la
-rwxr--r-- 1 root root 102821 9 20 23:14 teddy.jpg
# cd /usr/local/x-linux-ai/image-classification
# ./launch_bin_image_classification_testdata.sh
The running result is as follows:
.jpg)
Image Input
3.2 Object Detection
The application demonstrates a computer vision use case for object detection. Frames are captured from the camera input (/dev/videox) and analyzed by a neural network model parsed by OpenVX, TFLite or ONNX frameworks. A Gstreamer pipeline is used to stream the camera frames (using v4l2src), display a preview (using gtkwaylandsink), and perform neural network inference (using appsink).
3.2.1 Running through the Demo Launcher
The demo can be run by clicking on the Object Detection sample icon in the demo launcher. By default, the OpenVX application is installed via subsection 2.3 and is available in both C/C++ and Python.
.jpg)
Object Detection
3.2.2 Running the Command
The C/C++ and Python applications for object detection are located in the /usr/local/x-linux-ai/object-detection/ directory, and can be run with the -h argument for more helpful information:
# cd /usr/local/x-linux-ai/object-detection/
# ls -la
stai_mpu_object_detection #C++运行程序
stai_mpu_object_detection.py #Python运行程序
To simplify the startup of the demo, there are configured startup scripts in the application directory:
Starting the object detection demo using camera input
launch_bin_object_detection.sh #C++运行程序
launch_python_object_detection.sh #Python运行程序
Starting the object detection demo using image input
launch_bin_object_detection_testdata.sh #C++运行程序
launch_python_object_detection_testdata.sh #Python运行程序
3.2.3 Demo Showcase
Starting through the demo launcher defaults to using the camera input, which is consistent with the results of scripts using the camera input in the command launcher. Here is an example of a C/C++ program with the following specific testing conditions:
# cd /usr/local/x-linux-ai/object-detection
# ./launch_bin_object_detection.sh #或者点击demo启动器图标
.jpg)
Camera Input
Before running the program script for picture input, you need to prepare the recognized picture, here take a picture of a teddy bear and a kitten as an example, the picture is placed in the directory:
/usr/local/x-linux-ai/object-detection/models/coco_ssd_mobilenet/testdata
Then run the script, here as an example for the C/C++ application.
# cd /usr/local/x-linux-ai/object-detection/models/coco_ssd_mobilenet/testdata
# ls -la
-rwxr--r-- 1 root root 102821 9 20 23:14 teddy-and-cat.jpg
# cd /usr/local/x-linux-ai/object-detection
# ./launch_bin_object_detection_testdata.sh
The running result is as follows:
.jpg)
Image Input
3.3 Pose Estimation
This application demonstrates a computer vision use case for human pose estimation. Frames are captured from the camera input (/dev/videox) and analyzed by a neural network model parsed by the OpenVX framework. The application uses a model downloaded from the ST YoloV8n-pose from the GitHub branch of stm32-hotspot ultralytics.
3.3.1 Running through the Demo Launcher
The demo can be run by clicking on the Pose Estimation sample icon in the demo launcher, which by default is installed through subsection 2.3 as an OpenVX application, which defaults to a Python application.
.jpg)
Pose Estimation
3.3.2 Running the Command
The C/C++ and Python applications for pose estimation are located in the /usr/local/x-linux-ai/object-detection/ directory, and can be run with the -h parameter for more helpful information:
# cd /usr/local/x-linux-ai/pose-estimation/
# ls -la
stai_mpu_pose_estimation.py
To simplify the startup of the demo, there are configured startup scripts in the application directory:
Starting the pose estimation demo using camera input
launch_python_pose_estimation.sh
Starting the pose estimation demo using image input
launch_python_pose_estimation_testdata.sh
3.3.3 Demo Showcase
Starting through the demo launcher defaults to using the camera input, which is consistent with the results of scripts using the camera input in the command launcher. Here is an example of a C/C++ program with the following specific testing conditions:
# cd /usr/local/x-linux-ai/pose-estimation/
# ./launch_python_pose_estimation.sh #或者点击demo启动器图标
.jpg)
Camera Input
Before running the program script for image input, you need to prepare the image for recognition, here take a picture of a person running as an example, the image is placed in the directory:
/usr/local/x-linux-ai/pose-estimation/models/yolov8n_pose/testdata
Then run the script, here take the C/C++ application as an example.
# cd /usr/local/x-linux-ai/pose-estimation/models/yolov8n_pose/testdata
# ls -la
-rwxr--r-- 1 root root 102821 9 20 23:14 person-run.jpg
# cd /usr/local/x-linux-ai/pose-estimation
# ./launch_python_pose_estimation_testdata.sh
The running result is as follows:
.jpg)
Image Input
3.4 Semantic Segmentation
This application demonstrates a semantic segmentation use case for computer vision, capturing frames from a camera input (/dev/videox) and analyzing them with a neural network model parsed by the OpenVX framework. A Gstreamer pipeline is used to stream the camera frames (using v4l2src), display a preview (using gtkwaylandsink), and perform neural network inference (using appsink). The inference results are displayed in the preview and the overlay is implemented using GtkWidget and cairo. The application uses the model DeepLabV3 downloaded from the TensorFlow™ Lite Hub.
3.4.1 Running through the Demo Launcher
The demo can be run by clicking on the Semantic Segmentation sample icon in the demo launcher, which by default is installed through subsection 2.3 as an OpenVX application, which defaults to a Python application.
.jpg)
Semantic Segmentation
3.4.2 Running the Command
The C/C++ and Python applications for semantic segmentation are located in the /usr/local/x-linux-ai/object-detection/ directory, and can be run with the -h parameter for more helpful information:
# cd /usr/local/x-linux-ai/semantic-segmentation/
# ls -la
stai_mpu_semantic_segmentation.py
To simplify the startup of the demo, there are configured startup scripts in the application directory:
Starting the semantic segmentation demo with camera input
launch_python_semantic_segmentation.sh
Starting the semantic segmentation demo with image input
launch_python_semantic_segmentation_testdata.sh
3.4.3 Demo Showcase
Starting through the demo launcher defaults to using the camera input, which is consistent with the results of scripts using the camera input in the command launcher. Here is an example of a C/C++ program with the following specific testing conditions:
# cd /usr/local/x-linux-ai/semantic-segmentation/
# ./launch_python_semantic_segmentation.sh #或者点击demo启动器图标
.jpg)
Camera Input
Before running the program script for image input, you need to prepare the image for recognition, here is an example of an image of a person who is working, the image is placed in the directory:
/usr/local/x-linux-ai/semantic-segmentation/models/deeplabv3/testdata
Then run the script, here as an example for the C/C++ application.
# cd /usr/local/x-linux-ai/semantic-segmentation/models/deeplabv3/testdata
# ls -la
-rwxr--r-- 1 root root 102821 9 20 23:14 person-work.jpg
# cd /usr/local/x-linux-ai/semantic-segmentation
# ./launch_python_semantic_segmentation_testdata.sh
The running result is as follows:
.jpg)
Image Input
4. Reference Materials
X-Linux-AI-Tool
https://wiki.st.com/stm32mpu/wiki/X-LINUX-AI_Tool
ST 官方Wiki
https://wiki.st.com/stm32mpu/wiki/Category:X-LINUX-AI_expansion_package
|