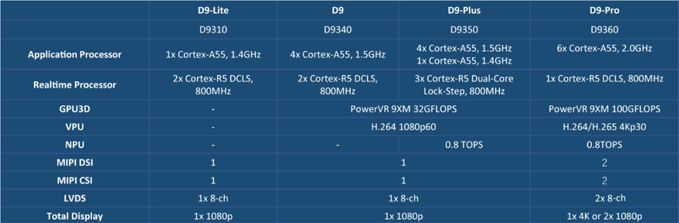
MYIR has launched the MYC-JD9360 CPU Module and MYD-JD9360 development board based on SemiDrive’s D9-Pro processor in August. The D9-Pro is a super powerful MPU with six Arm Cortex-A55 cores (up to 1.6GHz) and one dual-core lockstep high real-time and high-reliability Cortex R5 core (800MHz). Here we would like to introduce you the great advantages of the D9-Pro. You can select it as an excellent solution for your industrial applications.
1. Strong Processor Performance
1.1 ARM Core Processing Power
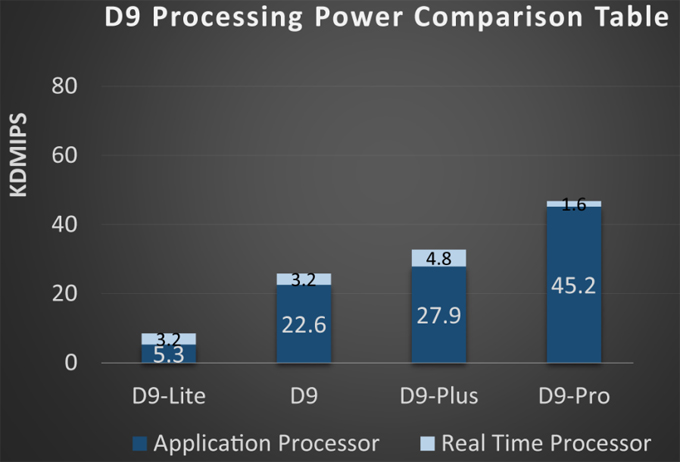
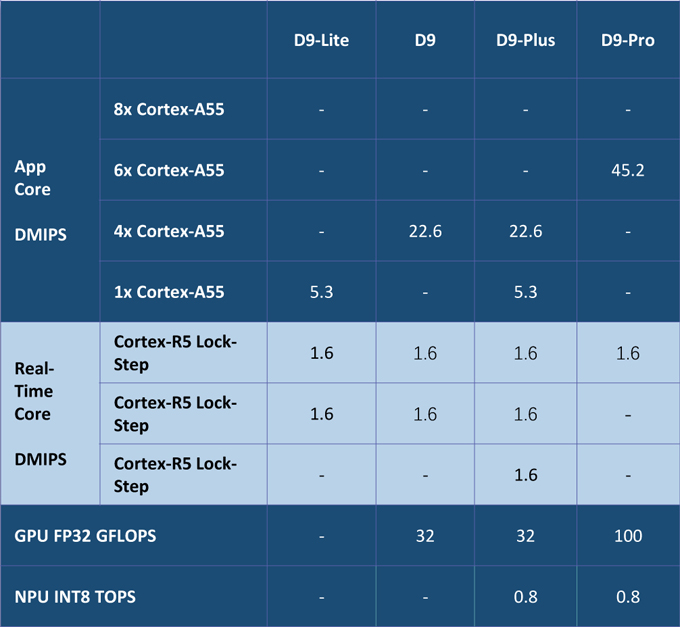
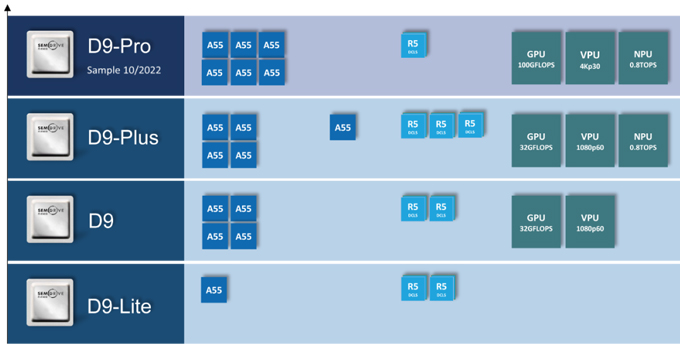
SemiDrive’s D9-Pro (D9360) application processor is among the high-reliability, high-security, high real-time and high-performance D series industrial processors. The D9-Pro is equipped with six Cortex-A55 cores and a single Cortex-R5 core, and its CPU performance reaches 45.2 + 1.6 KDMIPS.
1.2 3D GPU Performance
GPU performance is mainly reflected in games, multimedia processing, scientific computing and other fields. In games, GPU can speed up tasks such as graphics rendering and physics simulation, improve the picture quality and running speed of the game; In multimedia processing, GPU can accelerate tasks such as video decoding and image processing, and improve the efficiency and quality of multimedia applications; In scientific computing, GPU can accelerate tasks such as large-scale data processing and machine learning, improving computational efficiency and accuracy.
The D9-Pro processor has a PowerVR 9XM GPU with a performance of up to 100GFLOPS, making it more suitable for high-performance entertainment applications.
1.3 NPU Computing Power
A neural processing unit (NPU) can provide efficient and low-power deep learning algorithm acceleration ability, its main function is to accelerate training or inference on neural-network models. It can provide high-speed, efficient computing power and support a variety of deep learning frameworks such as TensorFlow, Caffe, MXNet and others. NPU can complete a large number of matrix operations and vector calculations in a relatively short time, thus speeding up the training and inference process of the models.
The D9-Pro processor has a NPU of 0.8Tops computing power, making it suitable for artificial intelligence and edge computing AI fields.
1.4 HD Player Decoding Performance
A vision processing unit (VPU) can provide high-performance and low-power video codec processing capabilities, including video coding, decoding, image processing, video output and so on. It can support a variety of video encoding formats, such as H.264, H.265, VP9, etc., and can also support multiple resolutions and frame rates for video processing.
The D9-Pro processor has a high-efficiency VPU supporting H.264 video encoding/decoding and H.265/VP8/VP9 video decoding at up to 4Kp30 solution.
2. Support for Multiple Operating Systems
The SemiDrive D9 series processors support AMP asymmetric multiprocessing, where multiple cores are isolated from each other and can run different operating systems. They generally support the following three OS:
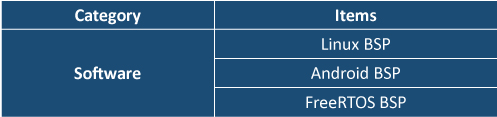
The D9-Pro processor can run Android and Linux Operating Systems, and there is also a single-core Cortex-R5 real-time processor that can run RTOS and supports secure boot and secure OS as well as fast response peripherals.
3. Wide Range of Applications
MYIR’s MYC-JD9360 CPU Module and MYD-JD9360 development board based on SemiDrive’s D9-Pro processors has strong video decoding and multimedia capabilities, and are suitable for high-performance display control machine, industrial robot, construction machinery T-BOX, smart cockpit, in-vehicle entertainment, intelligent medical equipment and more other applications.
4. Reliable Design of the D9-Pro SoM
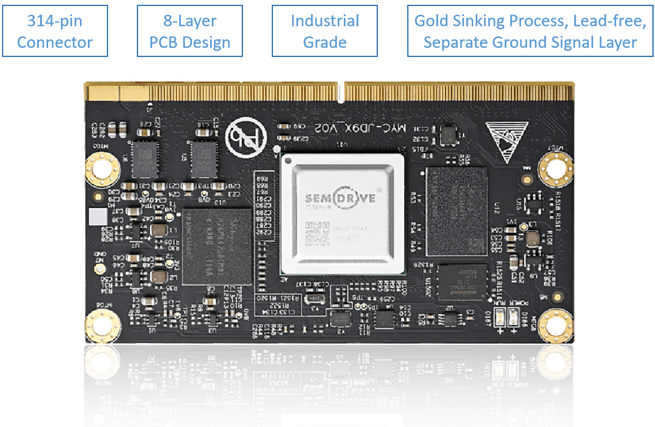
MYIR’s MYC-JD9360 CPU Module adopts high density and high speed circuit board design, and integrates D9-Pro processor, 2GB LPDDR4, 16GB eMMC Flash, 16MB SPI Nor Flash, 256Kbit EEPROM, Power IC and watchdog chip on the 82mm x 45mm board.
5. Rich Interface of the Evaluation Board
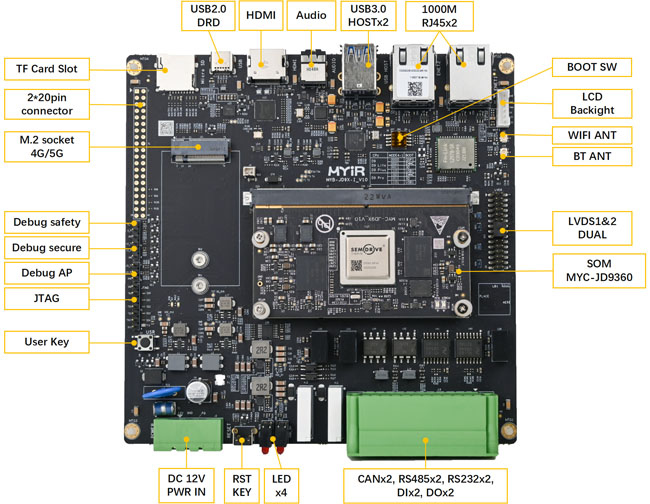
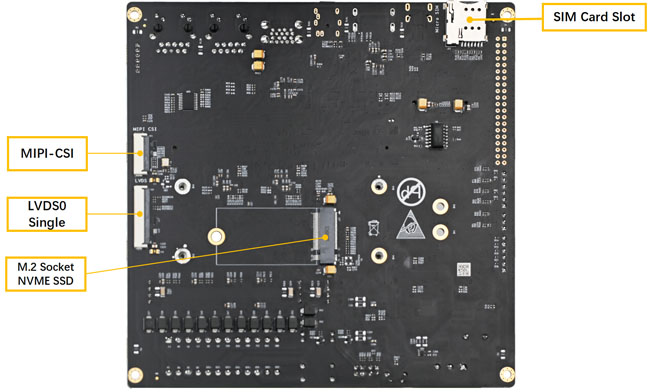
MYIR’s MYD-JD9360 Development Board is built around the MYC-JD9360 CPU Module to serve as a complete development platform for evaluation or prototyping purposes. The base board takes full features of the D9-pro processor to provide rich peripheral interfaces.
6. Developer Package Makes the Development Easier
The MYC-JD9360 CPU Module and MYD-JD9360 Development Board are preloaded with Linux OS before delivery. MYIR provides a wealth of software resources and documentations for Linux, Ubuntu and Android operations systems to help developers start their development easily. Software resources include but are not limited to Linux kernel, bootloader, drivers, images and related development tools. And the following is to share the main process of D9-Pro Linux software development:
6.1 Development Environment
-
Processor: D9-Pro (D9360)
-
Linux development hosts: Debian, Ubuntu, RHEL, etc., Ubuntu18.04 64bit desktop system
-
Install the SDK customized by MYIR
In the process of using the SDK to build this system image, you also need to install the cross toolchain, the SDK provided by MYIR contains various source code as well as the necessary cross toolchain, which can be used directly to compile applications.
The SDK installation steps are as follows:
Copy the SDK to the Linux directory and unzip it.
Create a tool chain directory:
PC$ sudo mkdir -p /tool
Unzip compile chain:
PC$ cd $HOME/MYD-JD9X
PC$ tar -xvf gcc_linaro_7.3.tar.gz -C /tool
Install and test the compilation chain:
A setup script env.sh is provided for easy setup of the compilation chain.
6.2 Build a Development Board Image
Step 1: Get the source code
The source code and relative tools will be provided with the board.
Step 2: Quickly compile the image
Here we need to use the envsetup.sh script provided by MYIR to set the environment variables.
Go to the SDK directory, run the ./build.sh config project configuration, and select board, project, boot mode and kernel version. Then execute ./build.sh to complete the compilation and packaging, and the image is generated to the out directory.
Just execute build.sh to compile the image:
PC$ ./build.sh
After image compilation is completed, an out directory is generated in the SDK source code. The out directory is automatically generated after the build.sh one-click compilation script is executed, and contains all image components.
Main components:
-
images_d9_ref, the image home directory of the board
-
binary directory, which contains the binary files of all components
-
build_object directory, which contains compilation information for components such as BSP and the buildroot system
-
images directory, final image directory, image burning package in .pac format
Step 3: Build the SD card image
Before building an SD card image, we need to build a full image first.
To prepare a full image, go to the SDK directory, run build.sh config, and select SD card boot for D9-Pro.
Then, compile the SD card image, compile and update the image package.
6.3 Burn the System Image
The D9 series processor has a variety of boot methods, and users can choose different methods to update according to their needs. There are several main ways to update:
-
USB burning: suitable for R&D debugging, testing and other scenarios.
-
Make SD card initiator: suitable for R&D debugging, quick startup and other scenarios.
-
Make SD card burner: suitable for mass production burning eMMC
MYIR provides two methods: SDFactoryTool burning and making SD card for burning.
Method 1: SDFactoryTool burning
Use the SDFactoryTool tool to burn through USB.
Connect the PC to the development board via USB, select boot mode, and switch the DIP switch to USB download mode.
To burn an image, start SDFactoryTool and download it.
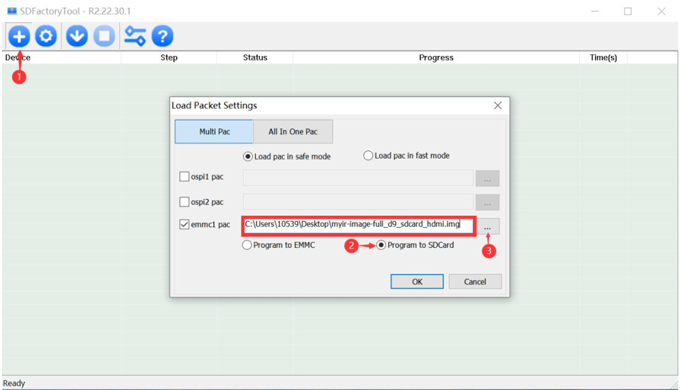
Method 2: SD card burning
In order to meet the mass production efficiency requirements, we can use the SD card burning method.
We can make SD card burner image package to achieve this method. In order to save time, MYIR has already completed the SD card burning image package compilation, users only need to compile and update the image package. (Please refer to the development manual for more details.)
6.4 Modify BSP
This section includes the compilation and update of U-boot, kernel and other related content, which is important.
a. Compile and update onboard SSDK
SemiDrive MCU SDK (SSDK) is used to develop MCU software for SemiDrive chip platforms, such as Safety R5 software for D9 series SoCs.
Compile SSDK:
wujl@system2-ubuntu1804:/media/wujl/D9/d9_ssdk$ ./build.sh ssdk
Upon the completion of the compilation, you can find safety.bin and secure.bin binary files in the source/ssdk/boards/d9_ref/build/ref/gcc/secure/ directory.
b. Compile and update onboard uboot
U-boot is a feature-rich open source boot program, including kernel boot, download updates and many other aspects.
Compile uboot:
wujl@system2-ubuntu1804:/media/wujl/D9/d9_ssdk$ ./build.sh uboot
After compiling, you can find the bootloader.img binary file in the out/images_d9_ref/binary/download_img/ directory.
Update uboot:
Copy the compiled image (bootloader.img) to the development board, and the uboot partition is /dev/mmcblk0p26. Run the following command to update it:
root@myd-jd9x:~# echo 0 > /sys/block/mmcblk0boot0/force_ro
root@myd-jd9x:~# echo 0 > /sys/block/mmcblk0boot1/force_ro
root@myd-jd9x:~# dd if=bootloader.img of=/dev/mmcblk0p26 bs=1M conv=sync 0
+1 records in
1+0 records out
c. Compile and update onboard Kernel
Compile Linux:
wujl@system2-ubuntu1804:/media/wujl/D9/d9_ssdk$ ./build.sh linux
After compiling, you can find the kernel.img and dtb.img binary files in the out/images_d9_ref/binary/download_img directory.
Update kernel and device tree:
Copy the compiled image (kernel.img) to the development board. The kernel partition is /dev/mmcblk0p38, and the dtb partition is /dev/mmcblk0p34. Run the following command to update:
root@myd-jd9x:~# echo 0 > /sys/block/mmcblk0boot0/force_ro
root@myd-jd9x:~# echo 0 > /sys/block/mmcblk0boot1/force_ro
root@myd-jd9x:~# dd if=kernel.img of=/dev/mmcblk0p38 bs=1M conv=sync
9+1 records in
10+0 records out
root@myd-jd9x:~# dd if=dtb.img of=/dev/mmcblk0p34 bs=1k conv=sync
113+1 records in
114+0 records out
6.5 Adapt to Hardware Platform
For the content related to the underlying driver of the chip, you can quickly define the pins, attributes, power supply, etc. of each node through the pin configuration tool provided by SemiDrive.
For configuration details, please refer to section 6 of “MYD-JD9X_Linux Software Development Guide”.
Finally, we can add our own application.
MYIR also provides an introduction to the "Makefile based applications", if you are interested, please contact MYIR.
|

