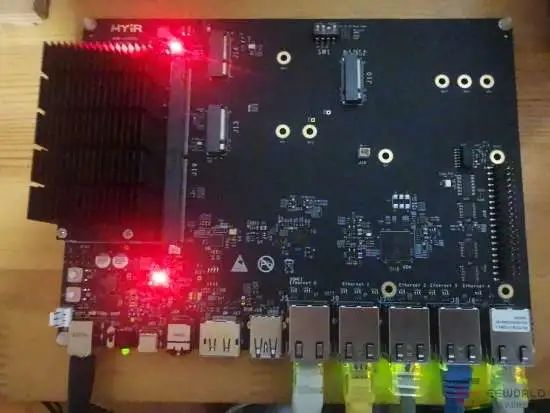
The MYD-J1028X development board is powered by the high-performance NXP LS1028A processor which features 1.5GHz dual ARM Cortex-A72 cores, with integrated 3D GPU for HMI, and a time-sensitive networking (TSN) -enabled Ethernet switch and Ethernet controllers. The MYD-J1028X board design has implemented five Gigabit TSN Ethernet ports which makes it suitable to be used as an industrial router.
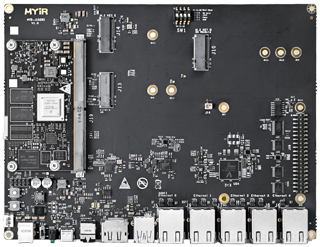
MYD-J1028X Development Board
Below user evaluation report is provided by ”HonestQiao" from EEWORLD on how to build a super powerful OpenWRT Soft Router based on the MYD-J1028X development board.
Ⅰ Description of the Network Structure
The network structure of the OpenWRT Soft Router is as follows:
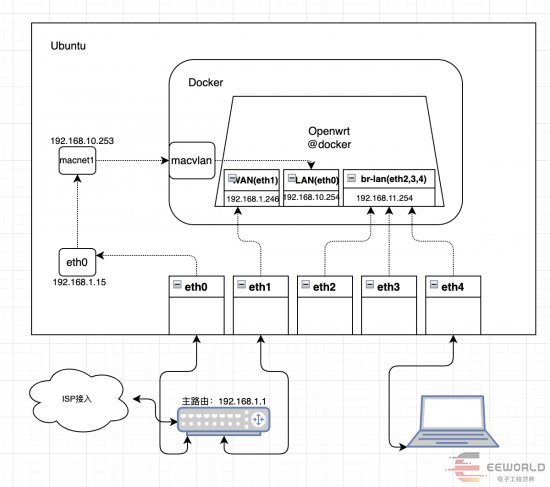
Run Ubuntu on the MYD-J1028X development board, then install docker, and run OpenWRT in docker.
The results are:
1. Run Ubuntu on the development board.
2. OpenWRT runs in docker.
3. Of the five gigabit network ports on the development board, one is reserved for Ubuntu networking and all the others are allocated to OpenWRT.
4. Ubuntu and OpenWRT can communicate.
5. OpenWRT is connected directly through a network port, rather than through docker and Ubuntu, in order to achieve performance optimization.
6. OpenWRT manages a complete subnet.
The related planned network segments are as follows:
1. Primary Route: Network segment 192.168.1.1/24
2. Ubuntu:
Networking IP address: 192.168.1.237(obtained by DHCP)
Interworking with OpenWRT IP: 192.168.10.253(Fixed)
3. OpenWRT:
Networking IP address: 192.168.1.246(obtained by DHCP)
Interworking with Ubuntu IP: 192.168.10.254(Fixed)
Subnet: 192.168.11.254/24
Note: The IP addresses obtained from DHCP are not fixed and may change according to the actual situation.
Ⅱ Construction Procedure
1. Install docker:
sudo apt update
sudo apt upgrade -y
sudo apt install docker-ce -y
2. Set docker management permissions for common users:
If you build using user name “root”, you can skip it, but it is highly recommended to use your own user name.
sudo usermod -aG docker $USER
newgrp docker
docker ps -a

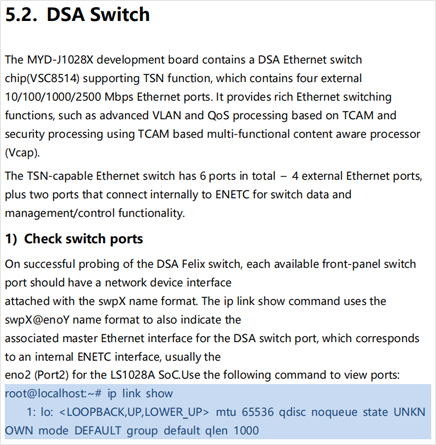
3. Ubuntu host network interface settings:
The default network port names are eno0, eno2, swp0, swp1, swp2, and swp3.
eno0 corresponds to Ethernet 0, swp0~3 corresponds to Ethernet1~4, and eno2 is the main Ethernet interface of the DSA switch.
Detailed network interface information can be known from MYIR’s manual "MYD-J1028X_Ubuntu_Software_Evaluation_Guide".
Now all we need to know is:
1) Ethernet 0: Allocation of Ubuntu, for the host system networking
2) Ethernet 1~4: Allocated to OpenWRT systems
Ethernet 1: For OpenWRT networking
Ethernet 2~4: Used as LAN interfaces. Of course, if you have multiple network access, you can freely allocate it for multi-WAN access.
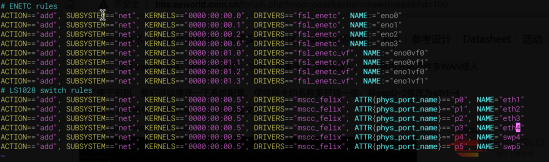
For easy identification, we can modify the system configuration to make the name of the network interface more readable, changing swp0~3 to eth1~4.
First, obtain the network interface name configuration file through the following instructions:
sudo grep -rn swp0 /etc/udev

sudo vim /etc/udev/rules.d/73-fsl-enetc-networking.rules
# Change swp0~3 to eth1~4
5. Start the openwrt docker instance:
There are many docker images for openwrt. After understanding, I choose the raymondwong/openwrt_r9 image.
docker pull raymondwong/openwrt_r9:autobuild-22.2.12-arm64
docker run --name openwrt \
--restart always \
-d --network macnet1 \
--ip=192.168.10.254 \
--privileged raymondwong/openwrt_r9:autobuild-22.2.12-arm64 /sbin/init
Normally, when starting a docker image, there is no need to specify the network and ip, and docker will be automatically set. But for the sake of mutual communication, let’s set this to macnet1 we just created and specify 192.168.10.254. For docker's network and the use of macvlan, please refer to docker official documents.
Once started, we can check the current running example:
docker ps

6. Network interworking and mutual access settings:
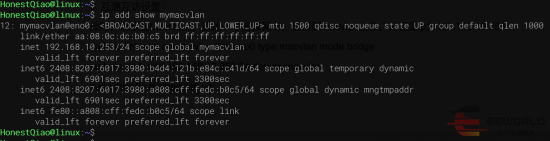
At this point, we need to add a virtual network interface to Ubuntu, bridge to the macvlan, and set the ip address to 192.168.10.253
sudo ip link add mymacvlan link eno0 type macvlan mode bridge
sudo ip addr add 192.168.10.253/24 dev mymacvlan
sudo ifconfig mymacvlan up
After setting, we can view the status of the virtual network interface:
ip add show mymacvlan
7. Assign physical network interfaces Ethernet 1~4 to OpenWRT:
Using “docker exec openwrt ifconfig”, we can check the network interface that OpenWRT is currently mounted on.
To assign a network interface to OpenWRT, set it to the Docker Namespace isolation space of OpenWRT.
Perform the following operations:
First, get the Namespace isolation space for the current OpenWRT:
nspid=$(sudo docker inspect -f '{{.State.Pid}}' openwrt)
echo $nspid
If it is displayed normally, it indicates that it is obtained. If the OpenWRT container is not running, it is not available.
Then set:
sudo mkdir -p /var/run/netns/
sudo ln -s /proc/$nspid/ns/net /var/run/netns/$nspid
echo $nspid
ip netns list
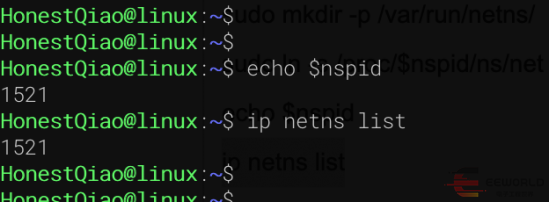
If they are the same, the ns space is correctly configured. Then, set the home of the network interface:
sudo ip link set eth1 netns $nspid
sudo ip link set eth2 netns $nspid
sudo ip link set eth3 netns $nspid
sudo ip link set eth4 netns $nspid
At this point, we can check to see if we have the right to use these network interfaces in OpenWRT:
Run the following command:
docker exec openwrt ifconfig
or:
sudo ip netns exec $nspid ifconfig
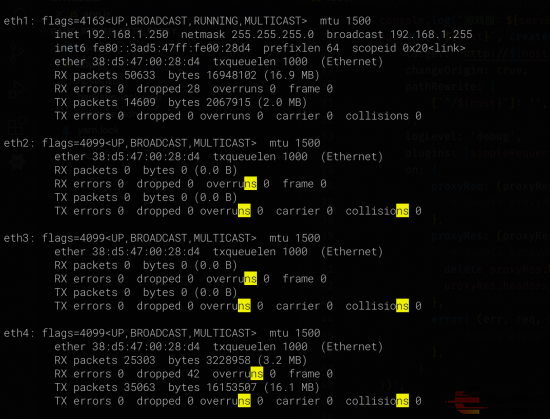
With the correct settings, we should see that eth1~4 has been assigned to OpenWRT.
If we run ifconfig -a on an Ubuntu host, we will no longer see these network interfaces.
Then, enable these network interfaces for OpenWRT:
sudo ip netns exec $nspid ip link set eth1 up
sudo ip netns exec $nspid ip link set eth2 up
sudo ip netns exec $nspid ip link set eth3 up
sudo ip netns exec $nspid ip link set eth4 up
sudo ip netns exec $nspid ifconfig
8. Configure OpenWRT's basic network:
After network interfaces are configured, you can configure the basic network of OpenWRT to facilitate subsequent management on the GUI.
Since OpenWRT Docker is already running, we can connect to OpenWRT environment directly through docker command for configuration.
docker exec -it openwrt sh
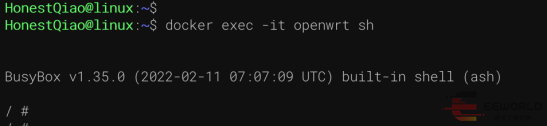
Enter the OpenWRT shell environment with the above instructions, and then edit the network configuration file:
vi /etc/config/network
config interface 'lan'
option ifname 'eth0'
option proto 'static'
option ipaddr '192.168.10.254'
option netmask '255.255.255.0'
config interface 'wan'
option ifname 'eth1'
option proto 'dhcp'
The following parts need to be modified:
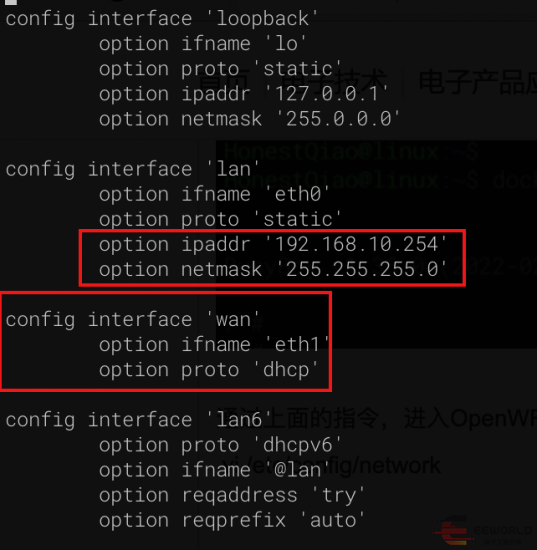
Set the fixed IP bit 192.168.10.254 for eth0 so that it can communicate with Ubuntu.
Then, set eth1 as the WAN network interface and obtain an IP address from the primary route through DHCP.
After the configuration is complete, restart the network for the configuration to take effect:
/etc/init.d/network restart
Use ifconfig to check the network status:
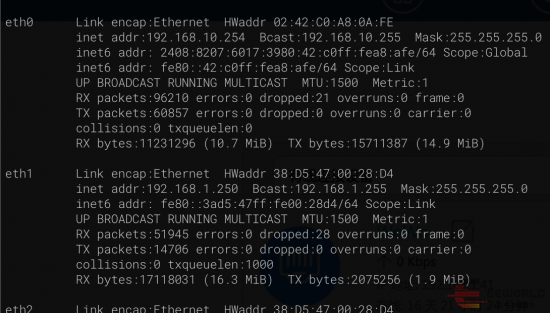
While DHCP is used, the actual IP displayed by eht1 may be different from the figure above, because it is obtained by DHCP.
9. OpenWRT firewall settings:
Once this is set up, we can't access it directly from Ubuntu, we still need to set up a firewall:
vi /etc/firewall.user
# Add the following at the end:
# user
iptables -I INPUT -s 192.168.10.0/24 -j ACCEPT
iptables -t nat -I POSTROUTING -o eth1 -j MASQUERADE
The details are as follows:
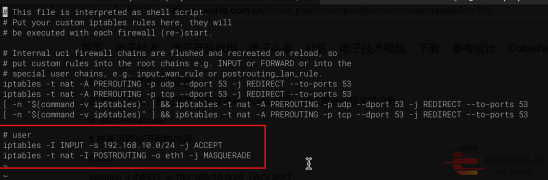
In iptable, two lines are set. The first line allows 192.168.10.0/24 subnet access management, and the second line allows eth1 to function as NAT to enable the subnet device to access the Internet.
10. Network interworking and mutual access tests:
For OpenWRT, ping 192.168.10.253
For Ubuntu, ping 192.168.10.254
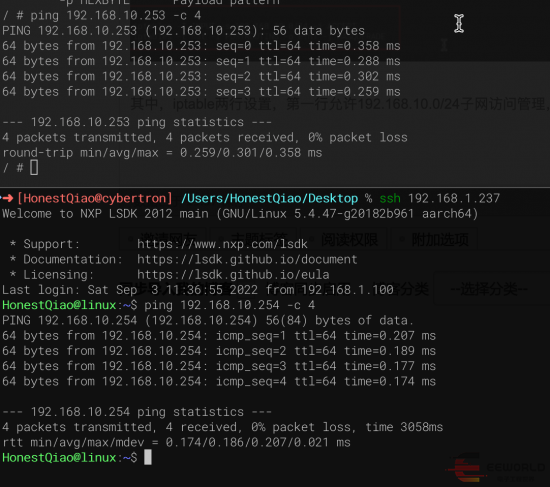
For Ubuntu, access OpenWRT's luci service:
curl -v http://192.168.10.254/

In this case, the network communication is successful.
11. Port forwarding settings:
But this is a mutual connection between Ubuntu and OpemWRT, and we need to be able to manage OpenWRT through luci on other computers.
Because Ubuntu is mounted on the main route, network segment 192.168.1.0/24, and IP address 192.168.1.237, and my MacBook Pro is also mounted on this network segment, I need to further configure it so that 192.168.1.237 can access OpenWRT through a browser.
This can be done on Ubuntu through the port forwarding feature of iptables, or through software. Since there will be other tests in the future, I used harpoxy, a special agent software to implement it.
sudo apt install haproxy
sudo vim /etc/haproxy/haproxy.cfg
# Add the following configuration
frontend web_in
mode http
maxconn 1000
bind *:8000
use_backend openwrt_server
backend openwrt_server
mode http
balance roundrobin
option httpclose
server openwrt 192.168.10.254:80 check
Detailed operations are as follows:
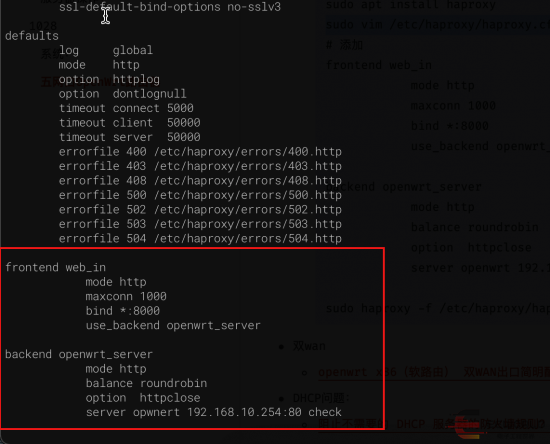
The above configuration, which indicates that the port 8000 reverse proxy to 192.168.10.254 port 80, follow-up visit http://192.168.1.237:8000/
haproxy is very powerful, and the configuration is clear, recommended to use.
After configuration, you can check the configuration and run:
sudo haproxy -f /etc/haproxy/haproxy.cfg -c
sudo /etc/init.d/haproxy start
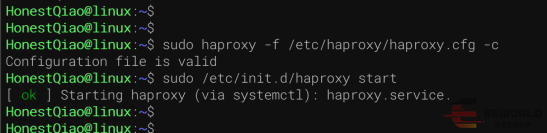
Now that the basic setup is in place, we can enter OpenWRT's graphical interface.
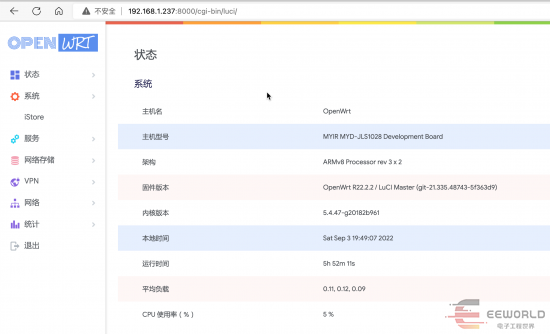
12. Log in to the OpenWRT management page:
Direct access to http://192.168.1.237:8000/ (192.168.1.237 Ubuntu as from the Lord for the IP address of the router)
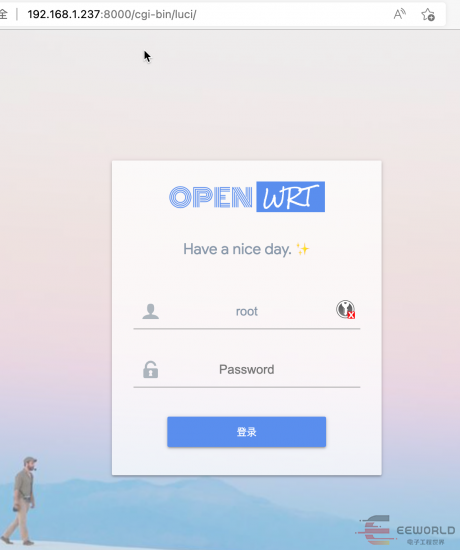
The default user name and password are “root; password”
Enter the following information to enter the management interface:
13. Subnet settings:
Previously, Ethernet1~4 has been assigned to OpenWRT and connected to eth1~4. eth1 is used for WAN networking, and eth2~4 can be used as LAN interface.
If you know the MWAN, you can also assign eth2~4 to the MWAN for multi-network access.
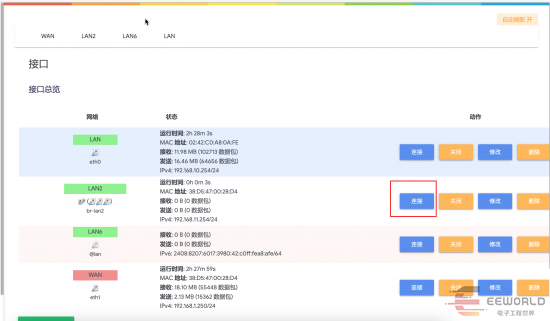
On the Network-Interface screen, we can view the current network interface:
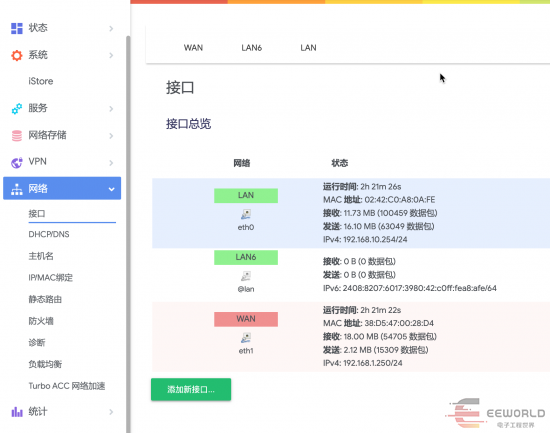
As we can see from above:
Set eth0 to a LAN and ip address to 192.168.10.254 for communication with Ubuntu.
eth1 is set to WAN, which is used to obtain IP addresses from the primary router and access the network.
Next, click Add New Interface to apply the remaining network interface:
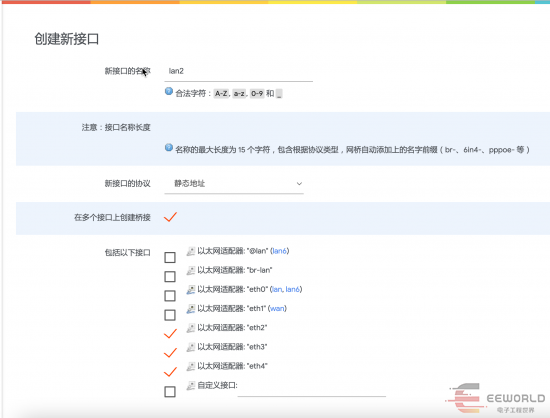
In this case, name it lan2 and set it to bridge mode, bridging eth2, 3, and 4 together.
Bridging eth0 was attempted, but the main route DHCP broadcast was polluted through the macvlan.
Then, set the address of LAN2:
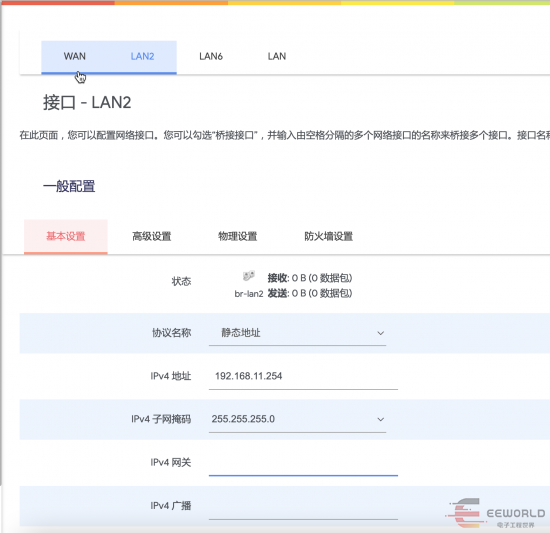
The above address can be set to 192.168.11.1 or whatever you prefer.
Pay attention to the firewall section, select lan:
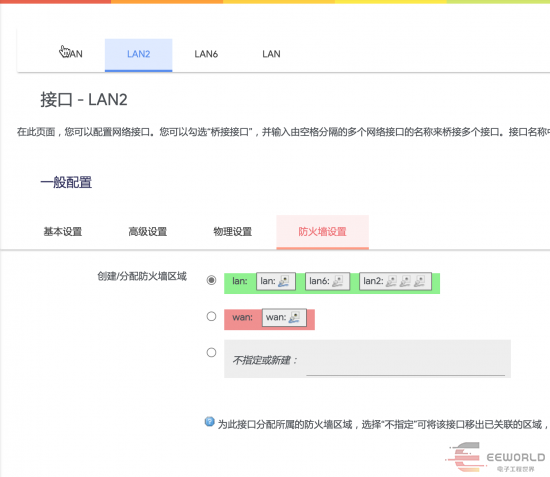
DHCP settings are at the bottom, which needs to be enabled:
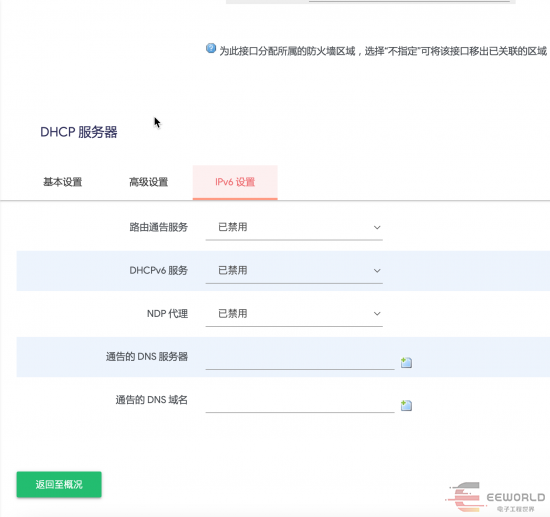
Click Save and Apply.

After saved and applied, return to the interface list page and click the corresponding button to start to use.
If the IP address is not displayed in LAN2, it indicates that it is not enabled. We need to click Connect.
At this point, the subnet is set up and can be tested by connecting to other network devices on Ethernet 2~4.
Ⅲ Practical effect
In my test, three devices were connected:
Ethernet 2: Connect to one single board computer
Ethernet 3: Connect ThinkPad laptops
Ethernet 4: Connect Dell laptops
All devices successfully automatically obtained IP addresses and successfully connected to the Internet:
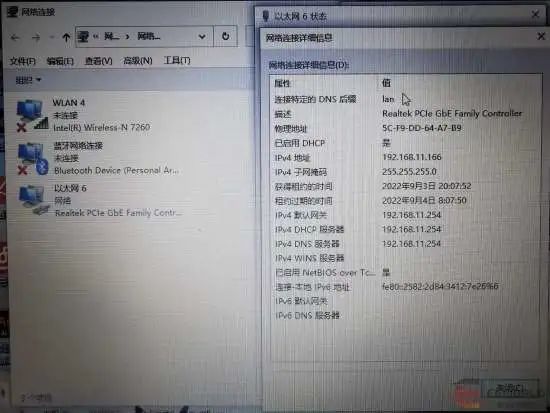
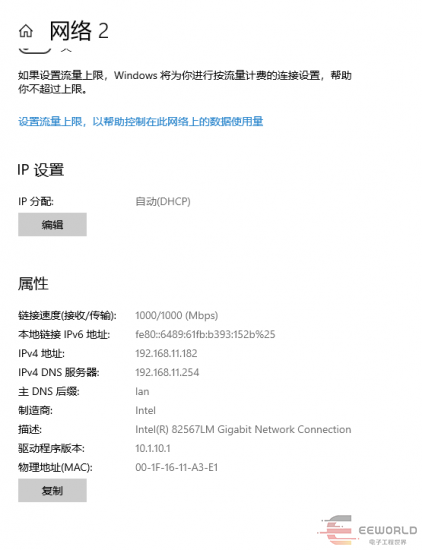
Accessing to web is fast and good, and 1080P video plays very smoothly:
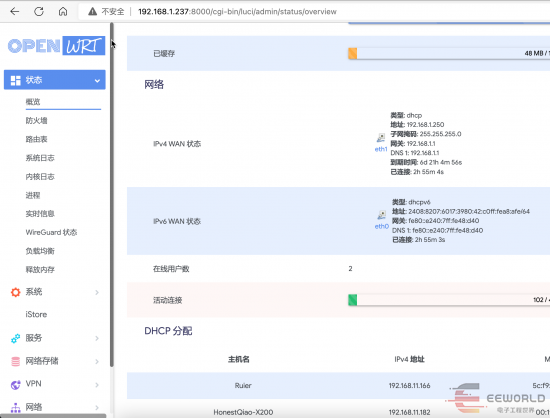
On the OpenWRT management page, we can also view the information about the currently connected device:
Ⅳ Summary
We've finished building this super powerful OpenWRT soft router.
Benefit from the powerful NXP LS1028A processor based MYD-J1028X development board, this soft router is wonderful, and the network speed is very fast, amazing!
|