This user evaluation report is provided by ”HonestQiao” from ElecFans. It is a Dash Cam testing experience through MYIR’s MYD-YT507H board based on Fluter+Django+OpenCV. Now let's see how to do that.
Here we will divide it into 10 parts below:
1. Business logic planning of Dash Cam
2. Hardware preparation
3. Development of camera information recording and real-time picture playing service
4. Camera video information recording
5. Complete code of camera service
6. RestFul service development of historical data
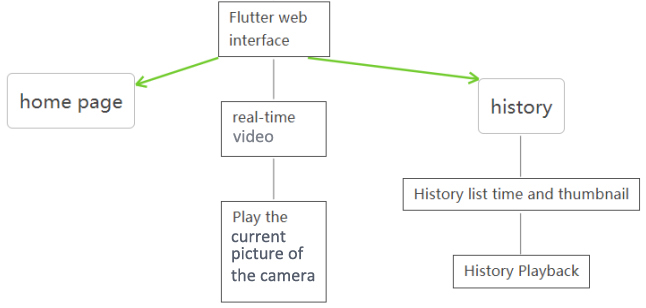
7. Flutter Web interface development
8. Overall operation effect
9. Vehicle test
10. Actual code usage
We will introduce each part.
1. Business logic planning of Dash Cam
The business logic planning of Dash Cam is divided into three parts:
1) Recording service: record video information captured by the camera and provide real-time playback service of the current camera pictures;
2) Django service: RestFul provides API interface to obtain historical data information, and provides access service for Flutter's Web interface;
3) Flutter Web interface: an interface for real-time picture playing and historical record playing

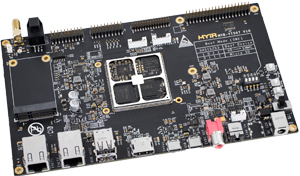
2. Hardware preparation
1) Main control board: MYD-YT507H development board
The board is based on ALLWINNER T507-H Processor with a 1.5GHz quad-core Cortex-A53 CPU and a Mali-G31 MP2 GPU. It has high performance but very economic.
2) Camera: Hikvision DS-E11 720P USB camera
3) Memory card: Sandisk 32GB high-speed MicroSD memory card
4) Router: Yunlai Treasure Box wireless router.
The router is not shown in the picture. It is OK to use an ordinary wireless router. It would be better if there is a high bandwidth router. Use one of the two USB 2.0 ports on the development board to connect to the router, and then connect the development board to the router through the network cable. Then power on.
3. Development of camera information recording and real-time picture playing service
When trying to broadcast MJPEG video streaming, mjpeg_streamer was used, but it is unclear how to segment the video. The Dash Cam usually divides and stores the videos according to a certain time, so single large video should be avoided. OpenCV can also get the camera information and write it to a file as needed. At last, the scheme of Python+OpenCV is adopted. Python is responsible for the specific logic, and Python OpenCV is responsible for the collection of camera video data.
The video capture part includes the following specific functions:
1) Capable of collecting camera data.
2) It can provide real-time video viewing.
3) The video data can be written to the file according to the time, and automatically be divided.
Python opencv is responsible for collecting camera data. Python is responsible for writing video data to files. It takes a lot of time to provide real-time video preview. The data needs to be reused because I’m writing to a file and providing a preview at the same time. I got to learn that I can send the pictures collected by Python opencv as JPEG data through HTTP by frame, and then the player side can receive MJPEG data stream for playback. Therefore, the first version implemented a Python version of the MJPEG playback service that reads frames, writes to temporary files, and reads data back from temporary files.
In order to improve efficiency, an optimization is also made to perform the conversion directly in memory without writing to temporary files. The resulting code is as follows:
#HTTP server request processing: web page, MJPEG data stream
class CamHandler(BaseHTTPRequestHandler):
def do_GET(self):
# mjpeg
if self.path.endswith('.mjpg'):
self.send_response(200)
self.send_header('Content-type','multipart/x-mixed-replace; boundary=--jpgboundary')
self.end_headers()
while True:
if is_stop:
break
try:
# rc,img = cameraCapture.read()
rc,img = success,frame
if not rc:
continue
if True:
imgRGB=cv2.cvtColor(img,cv2.COLOR_BGR2RGB)
jpg = Image.fromarray(imgRGB)
tmpFile = BytesIO()
jpg.save(tmpFile,'JPEG')
self.wfile.write(b"--jpgboundary")
self.send_header(b'Content-type','image/jpeg')
self.send_header(b'Content-length',str(tmpFile.getbuffer().nbytes))
self.end_headers()
jpg.save(self.wfile,'JPEG')
else:
img_fps = JPEG_QUALITY_VALUE
img_param = [int(cv2.IMWRITE_JPEG_QUALITY), img_fps]
img_str = cv2.imencode('.jpg', img, img_param)[1].tobytes() # change image to jpeg format
self.send_header('Content-type','image/jpeg')
self.end_headers()
self.wfile.write(img_str)
self.wfile.write(b"
--jpgboundary
") # end of this part
time.sleep(0.033)
except KeyboardInterrupt:
self.wfile.write(b"
--jpgboundary--
")
break
except BrokenPipeError:
continue
return
# webpag
if self.path == '/' or self.path.endswith('.html'):
self.send_response(200)
self.send_header('Content-type','text/html')
self.end_headers()
self.wfile.write(b'Live video')
self.wfile.write(('< img src="http://%s/live.mjpg" data-ke-src="http://%s/live.mjpg"/>' % self.headers.get('Host')).encode())
self.wfile.write(b'')
Return
Above code provides the following two functions:
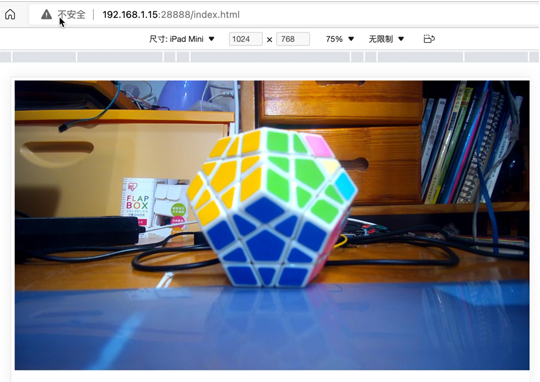
1) If you access through a browser http://ip: Port/index.html, it will return a web page with the address of the MJPEG call.
2) If you access through a browser http://ip: The port/live.mjpg, the MJPEG streaming data will be returned for playback.
Flutter's Video function supports the Stream mode. It can use WebSocket to obtain data and then play it. So as long as the frame data obtained can be provided by WebSocket on the server side, it can be played normally. Finally, I used Python to develop a WebSocket service that can provide real-time video data. The specific code is as follows:
# websocket Service Request Processing
async def CamTransmitHandler(websocket, path):
print("Client Connected !")
try :
while True:
# rc,img = cameraCapture.read()
rc,img = success,frame
if not rc:
continue
img_fps = JPEG_QUALITY_VALUE
img_param = [int(cv2.IMWRITE_JPEG_QUALITY), img_fps]
encoded = cv2.imencode('.jpg', img, img_param)[1]
data = str(base64.b64encode(encoded))
data = data[2:len(data)-1]
await websocket.send(data)
# cv2.imshow("Transimission", frame)
# if cv2.waitKey(1) & 0xFF == ord('q'):
# break
# cap.release()
except EXCEPTION_CONNECTION_CLOSE as e:
print("Client Disconnected !")
# cap.release()
except:
print("Someting went Wrong !")
The above two parts of code only contains the key parts.
So far, the real-time streaming media function is realized.
4. Camera video information record
In fact, the real-time video function of the previous step also depends on this step, because it needs to share the actual obtained camera information.
Its basic logic is also relatively simple, and the steps are as follows:
1) Initialize opencv and start acquiring camera data frames
2) Check whether the scheduled time is reached
3) If the time is not reached, continue to write the current video
4) When the time is up, close the current video, write thumbnails and open new file to write
the specific codes as follows:
# Capture camera
cameraCapture = cv2.VideoCapture(CAMERA_NO)
# Camera parameter setting
cameraCapture.set(cv2.CAP_PROP_FRAME_WIDTH,
320)cameraCapture.set(cv2.CAP_PROP_FRAME_WIDTH,
240)cameraCapture.set(cv2.CAP_PROP_SATURATION, 135)
fps=30
size=(int(cameraCapture.get(cv2.CAP_PROP_FRAME_WIDTH)),int(cameraCapture.get(cv2.CAP_PROP_FRAME_HEIGHT)))
# Read captured data
success,frame = cameraCapture.read()
while True:
if is_stop:
success = False
break;
success,frame = cameraCapture.read()
if not success:
continue
time_now = get_current_time()
if time_now["time"] - time_record["time"] >= ROTATE_TIME:
if time_record_prev:
thubm_file = get_file_name(time_record_prev, 'thumbs', 'jpg')
print("[Info] write to thumb: %s" % thubm_file)
if not os.path.isfile(thubm_file):
cv2.imwrite(thubm_file, frame)
time_record = time_now
time_record_prev = get_current_time()
video_file = get_file_name(time_record_prev, 'videos', MEDIA_EXT)
print("[Info] write to video: %s" % video_file)
# encode = cv2.VideoWriter_fourcc(*"mp4v")
encode = cv2.VideoWriter_fourcc(*'X264')
# encode = cv2.VideoWriter_fourcc(*'AVC1')
# encode = cv2.VideoWriter_fourcc(*'XVID')
# encode = cv2.VideoWriter_fourcc(*'H264')
videoWriter=cv2.VideoWriter(video_file, encode,fps,size) # mp4
numFrameRemaining = ROTATE_TIME * fps #Camera capture duration
while success and numFrameRemaining > 0: v
ideoWriter.write(frame) s
uccess,frame = cameraCapture.read()
numFrameRemaining -= 1
cameraCapture.release()
The logic of the above code is very clear, and you can understand it at a glance if you have the foundation of opencv. One key point to note is encode=cv2.VideoWriter_ Fourcc (*'X264 '). In different environments, the encoding methods provided are not identical. In the Ubuntu environment of the MYD-YT507H development board, you can use X264 for encoding. The above code will continuously read the data frame of the camera, store it in the frame variable, and then write it to the video file. Time judgment is performed to determine whether to write to the new video file. The frame variable will also be used in the previous real-time video service, which is equivalent to sharing.
5. The complete code of the camera service
After the above two parts, the service code of the camera is completed.
The overall code is as follows:
# -*- coding: utf-8 -*-
import signal
import cv2
import time
from PIL import Image
from threading import Thread
from http.server import BaseHTTPRequestHandler,HTTPServer
from socketserver import ThreadingMixIn
from io import BytesIO
import os
import sys
import websockets
import asyncio
import base64
import ctypes
import inspect
CAMERA_NO = 2
ROTATE_TIME = 120
MJPEG_ENABLE = 1
WEBSOCKET_ENABLE = 1
MJPEG_SERVER_PORT = 28888
WEBSOCKET_PORT = 28889
JPEG_QUALITY_VALUE = 65
STORE_DIR = "./data/" if os.uname()[0] == 'Darwin' else "/sdcard/data/"
MEDIA_EXT = "mkv"
EXCEPTION_CONNECTION_CLOSE = websockets.exceptions.ConnectionClosed if sys.version[:3] == '3.6' else websockets.ConnectionClosed
def _async_raise(tid, exctype):
"""raises the exception, performs cleanup if needed"""
try:
tid = ctypes.c_long(tid)
if not inspect.isclass(exctype):
exctype = type(exctype)
res = ctypes.pythonapi.PyThreadState_SetAsyncExc(tid, ctypes.py_object(exctype))
if res == 0:
# pass
raise ValueError("invalid thread id")
elif res != 1:
# """if it returns a number greater than one, you're in trouble,
# and you should call it again with exc=NULL to revert the effect"""
ctypes.pythonapi.PyThreadState_SetAsyncExc(tid, None)
raise SystemError("PyThreadState_SetAsyncExc failed")
except Exception as err:
print(err)
def stop_thread(thread):
"""termnate thead"""
_async_raise(thread.ident, SystemExit)
# Signal processing callback
def signal_handler(signum, frame):
# global cameraCapture
# global thread
# global server
# global is_stop
# global success
print('signal_handler: caught signal ' + str(signum))
if signum == signal.SIGINT.value:
print('stop server:')
is_stop = True
success = False
print("mjpeg server.socket.close...")
server.socket.close()
print("mjpeg server.shutdown...")
server.shutdown()
print("ws server.socket.close...")
server_ws.ws_server.close()
time.sleep(1)
# print("ws server.shutdown...")
# await server_ws.ws_server.wait_closed()
print("mjpeg thread.shutdown...")
thread_mjpeg.join()
print("ws loop.shutdown...")
# event_loop_ws.stop()
event_loop_ws.call_soon_threadsafe(event_loop_ws.stop)
time.sleep(1)
# print("ws thread.shutdown...")
# stop_thread(thread_ws)
# time.sleep(1)
# print(server)
# print(server_ws)
print(thread_mjpeg.is_alive())
print(thread_ws.is_alive())
print(event_loop_ws.is_running())
# thread_ws.join()
print("cameraCapture.release...")
cameraCapture.release()
print("quit...")
# print(server_ws)
sys.exit(0)
# http Server request processing: web page, MJPEG data stream
class CamHandler(BaseHTTPRequestHandler):
def do_GET(self):
# mjpeg Steaming
if self.path.endswith('.mjpg'):
self.send_response(200)
self.send_header('Content-type','multipart/x-mixed-replace; boundary=--jpgboundary')
self.end_headers()
while True:
if is_stop:
break
try:
# rc,img = cameraCapture.read()
rc,img = success,frame
if not rc:
continue
if True:
imgRGB=cv2.cvtColor(img,cv2.COLOR_BGR2RGB)
jpg = Image.fromarray(imgRGB)
tmpFile = BytesIO()
jpg.save(tmpFile,'JPEG')
self.wfile.write(b"--jpgboundary")
self.send_header(b'Content-type','image/jpeg')
self.send_header(b'Content-length',str(tmpFile.getbuffer().nbytes))
self.end_headers()
jpg.save(self.wfile,'JPEG')
else:
img_fps = JPEG_QUALITY_VALUE
img_param = [int(cv2.IMWRITE_JPEG_QUALITY), img_fps]
img_str = cv2.imencode('.jpg', img, img_param)[1].tobytes() # change image to jpeg format
self.send_header('Content-type','image/jpeg')
self.end_headers()
self.wfile.write(img_str)
self.wfile.write(b"
--jpgboundary
") # end of this part
time.sleep(0.033)
except KeyboardInterrupt:
self.wfile.write(b"
--jpgboundary--
")
break
except BrokenPipeError:
continue
return
# webpage
if self.path == '/' or self.path.endswith('.html'):
self.send_response(200)
self.send_header('Content-type','text/html')
self.end_headers()
self.wfile.write(b'Live video')
self.wfile.write((' ' % self.headers.get('Host')).encode()) ' % self.headers.get('Host')).encode())
self.wfile.write(b'')
Return
class ThreadedHTTPServer(ThreadingMixIn, HTTPServer):
"""Handle requests in a separate thread."""
# star MJPEG service
def mjpeg_server_star():
global success
global server
global thread_mjpeg
try:
server = ThreadedHTTPServer(('0.0.0.0', MJPEG_SERVER_PORT), CamHandler)
print("mjpeg server started: http://0.0.0.0:%d" % MJPEG_SERVER_PORT)
# server.serve_forever()
thread_mjpeg = Thread(target=server.serve_forever);
thread_mjpeg.start()
except KeyboardInterrupt:
print("mjpeg server stoping...")
server.socket.close()
server.shutdown()
print("mjpeg server stoped")
# websocket Service Request Processing
async def CamTransmitHandler(websocket, path):
print("Client Connected !")
try :
while True:
# rc,img = cameraCapture.read()
rc,img = success,frame
if not rc:
continue
img_fps = JPEG_QUALITY_VALUE
img_param = [int(cv2.IMWRITE_JPEG_QUALITY), img_fps]
encoded = cv2.imencode('.jpg', img, img_param)[1]
data = str(base64.b64encode(encoded))
data = data[2:len(data)-1]
await websocket.send(data)
# cv2.imshow("Transimission", frame)
# if cv2.waitKey(1) & 0xFF == ord('q'):
# break
# cap.release()
except EXCEPTION_CONNECTION_CLOSE as e:
print("Client Disconnected !")
# cap.release()
except:
print("Someting went Wrong !")
# websocket server startup
def websocket_server_start():
global thread_ws
global server_ws
global event_loop_ws
event_loop_ws = asyncio.new_event_loop()
def run_server():
global server_ws
print("websocket server started: ws://0.0.0.0:%d" % WEBSOCKET_PORT)
server_ws = websockets.serve(CamTransmitHandler, port=WEBSOCKET_PORT, loop=event_loop_ws)
event_loop_ws.run_until_complete(server_ws)
event_loop_ws.run_forever()
thread_ws = Thread(target=run_server)
thread_ws.start()
# try:
# yield
# except e:
# print("An exception occurred")
# finally:
# event_loop.call_soon_threadsafe(event_loop.stop)
# Get the stored file name
def get_file_name(time_obj, path, ext):
file_name_time = "%04d-%02d-%02d_%02d-%02d-%02d" % (time_obj["year"], time_obj["month"], time_obj["day"], time_obj["hour"], time_obj["min"], 0)
return '%s/%s/%s.%s' % (STORE_DIR, path, file_name_time, ext)
# Get the current hour time
def get_current_time():
time_now = time.localtime()
time_int = int(time.time())
return {
"year": time_now.tm_year,
"month": time_now.tm_mon,
"day": time_now.tm_mday,
"hour": time_now.tm_hour,
"min": time_now.tm_min,
"sec": time_now.tm_sec,
"time": time_int - time_now.tm_sec
}
# Set signal callback
signal.signal(signal.SIGINT, signal_handler)
signal.signal(signal.SIGTERM, signal_handler)
# Capture camera
cameraCapture = cv2.VideoCapture(CAMERA_NO)
# Camera parameter setting
cameraCapture.set(cv2.CAP_PROP_FRAME_WIDTH, 320)
cameraCapture.set(cv2.CAP_PROP_FRAME_WIDTH, 240)
cameraCapture.set(cv2.CAP_PROP_SATURATION, 135)
fps = 30
size=(int(cameraCapture.get(cv2.CAP_PROP_FRAME_WIDTH)),int(cameraCapture.get(cv2.CAP_PROP_FRAME_HEIGHT)))
# Read captured data
success,frame = cameraCapture.read()
if not success:
print("camera start failed.")
quit()
is_stop = False
server = None
server_ws = None
event_loop_ws = None
thread_mjpeg = None
thread_ws = None
mjpeg_server_star()
websocket_server_start()
print("record server star:")
thubm_file = None
video_file = None
time_start = int(time.time())
time_record = {"time":0}
time_record_prev = None
while True:
if is_stop:
success = False
break;
success,frame = cameraCapture.read()
if not success:
continue
time_now = get_current_time()
if time_now["time"] - time_record["time"] >= ROTATE_TIME:
if time_record_prev:
thubm_file = get_file_name(time_record_prev, 'thumbs', 'jpg')
print("[Info] write to thumb: %s" % thubm_file)
if not os.path.isfile(thubm_file):
cv2.imwrite(thubm_file, frame)
time_record = time_now
time_record_prev = get_current_time()
video_file = get_file_name(time_record_prev, 'videos', MEDIA_EXT)
print("[Info] write to video: %s" % video_file)
# encode = cv2.VideoWriter_fourcc(*"mp4v")
encode = cv2.VideoWriter_fourcc(*'X264')
# encode = cv2.VideoWriter_fourcc(*'AVC1')
# encode = cv2.VideoWriter_fourcc(*'XVID')
# encode = cv2.VideoWriter_fourcc(*'H264')
videoWriter=cv2.VideoWriter(video_file, encode,fps,size) # mp4
numFrameRemaining = ROTATE_TIME * fps #Camera capture duration
while success and numFrameRemaining > 0:
videoWriter.write(frame)
success,frame = cameraCapture.read()
numFrameRemaining -= 1
cameraCapture.release()
In the above code, in addition to the three parts mentioned above, it also includes the part of starting web and websocket threads. Because the core logic is to read video data and write files, other parts are started in a thread mode for simultaneous processing.
Save the above code as DriveingRecorderAndMjpegServer.py, and then run it. (For dependent packages, see requirements. txt in the code base).
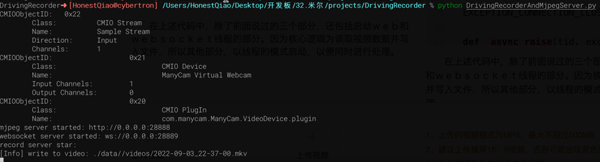
The actual access effect is as follows:
6. RestFul service development of historical data
Historical data service can also be written directly in Python, but in consideration of scalability, Django is used. Djano service needs to provide the following functions:
1) API interface is provided to obtain the list of historical data records and facilitate the presentation of the front-end interface;
2) Provide hosting of Flutter Web interface code files for browser access;
3) Provide access to static files, such as viewing historical video files
No. 2) and No. 3) are essentially one problem, which can be realized through Django's static function.
That is to provide the following configurations for settings. py:
STATIC_URL = 'static/'
STATICFILES_DIRS = [
BASE_DIR / "static"
]
No. 1) provides external api services. You need to set the corresponding url interface, read the history file information, and generate the json data structure required by the front end. The specific code of this part is as follows:
# Storage directory of media files, and suffixes of thumbnails and video files
THUMB_HOME_DIR = "%s/%s/data/thumbs/" % (BASE_DIR, STATIC_URL)
VIDEO_HOME_DIR = "%s/%s/data/videos/" % (BASE_DIR, STATIC_URL)
IMG_FILTER = [".jpg"]
MEDIA_FILTER = [ ".mkv"]
import json
from django.shortcuts import render, HttpResponse
from rest_framework.response import Response
from rest_framework.permissions import AllowAny
from rest_framework.decorators import api_view, permission_classes
import os
from django.conf import settings
THUMB_HOME_DIR = settings.THUMB_HOME_DIR
VIDEO_HOME_DIR = settings.VIDEO_HOME_DIR
IMG_FILTER = settings.IMG_FILTER
MEDIA_FILTER = settings.MEDIA_FILTER
# Create your views here.
@api_view(['GET'],)
@permission_classes([AllowAny],)
def hello_django(request):
str = '''[
{
"id": 1,
"time": "2022-07-28 21:00",
"title": "2022-07-28 21:00",
"body": "videos/2022-07-28_2100.mp4"
},
{
"id": 2,
"time": "2022-07-28 23:00",
"title": "2022-07-28 23:00",
"body": "videos/2022-07-28_2300.mp4"
},
{
"id": 3,
"time": "2022-07-28 25:00",
"title": "2022-07-28 25:00",
"body": "videos/2022-07-28_2500.mp4"
}
]'''
_json = json.loads(str)
return HttpResponse(json.dumps(_json), content_type='application/json')
@api_view(['GET'],)
@permission_classes([AllowAny],)
def history_list(request):
next = request.GET.get("next", '')
print(f"thumb next = {next}")
path = "/".join(request.path.split("/")[3:])
print(f"thumb request.path= {request.path}")
print(f"thumb path = {path}")
#print os.listdir(FILE_HOME_DIR+".none/")
data = {"files":[], "dirs":[]}
print(data)
child_path = THUMB_HOME_DIR+next
print(f"child_path = {child_path}")
data['cur_dir'] = path+next
print(data)
for dir in os.listdir(child_path):
if os.path.isfile(child_path+"/"+dir):
if os.path.splitext(dir)[1] in IMG_FILTER:
data['files'].append(dir)
else:
data['dirs'].append(dir)
print(data)
data['files']=sorted(data['files'])
data['files'].reverse()
data['infos'] = []
for i in range(0,len(data['files'])):
thumb_name = data['files'][i]
video_name = thumb_name.replace('.jpg', MEDIA_FILTER[0])
file_time = thumb_name.replace('.jpg', '').replace('_', ' ')
data['infos'].append(
{
"id": i,
"time": file_time,
"title": file_time,
"body": thumb_name,
'thumb': thumb_name,
'video': video_name
}
)
return Response(data['infos'], status = 200)
There are two interfaces:
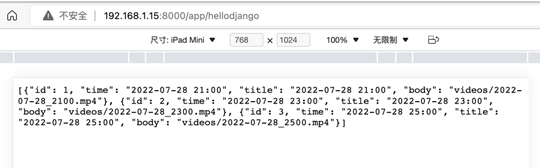
hello_ Django is the first one to learn to use. It returns to write dead json data.
history_ List is a folder for automatically traversing the thumbnail files so as to obtain the thumbnail file information, and generate the
required json data format.
The corresponding code base file also contains requirements.txt, which indicates the actual required dependent libraries.
Download the code, enter the directory where manage.py is located, and execute the following command to start:
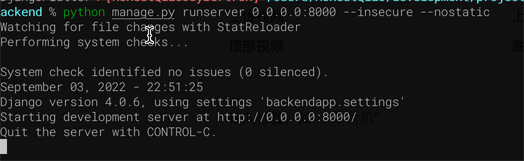
Visit 192.168.1.15:8000/app/hellodjango:
Access: History List – Django REST framework
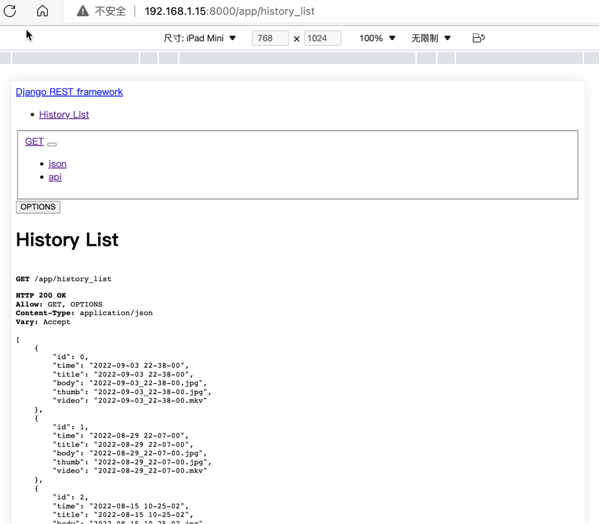
You can see the history_list interface and now actual required data can be provided.
7. Flutter Web interface development
There are many codes designed in this part, so only the codes of key parts are described.
The actual code developed is located in the lib directory, specifically:
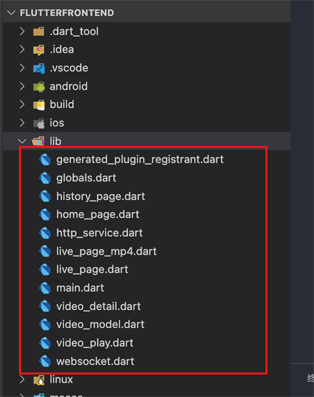
Globals.dart: global variable definition
Main.dart: program entry
home_ Page.dart: Home
live_ Page.dart: real-time playback
live_ page_ Mp4.dart: test playing mp4 video
history_ Page.dart: History list page
video_ Detail.dart: Details of a single history record
video_ Play.dart: play specific historical videos
video_ Model. dart: the data model of a single record
http_ Service.dart: request RestFul interface
Websocket.dart: WebSocket request for real-time video
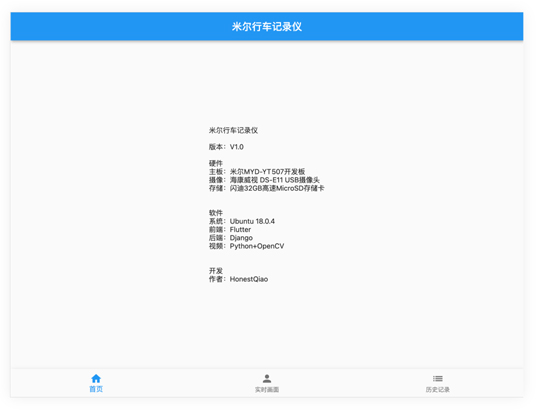
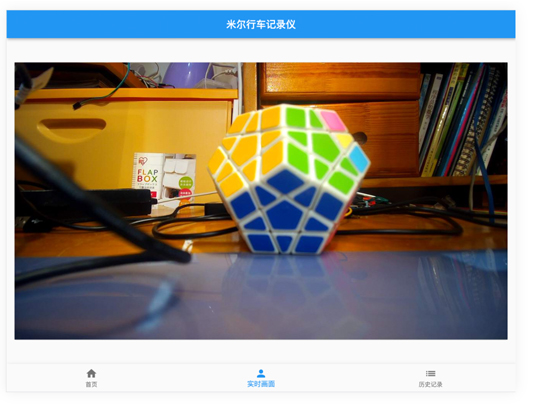
Scaffold is used to simulate the operation interface of mobile phone/Pad. The specific interface is as follows:
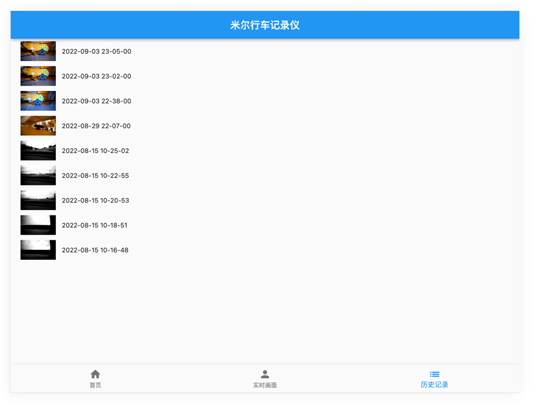
In the real-time screen interface, WebSocket is used to monitor, obtain information, and then use the Stream mode to push it to the video player. In the history interface, request the list data through RestFul, and then render it.
8. Overall operation effect
1) Real time screen:
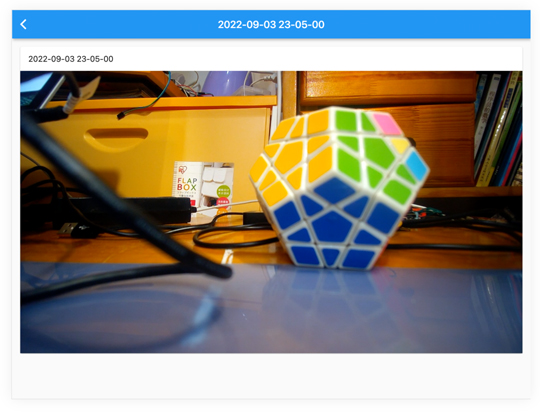
2) History list:
3) History playback:
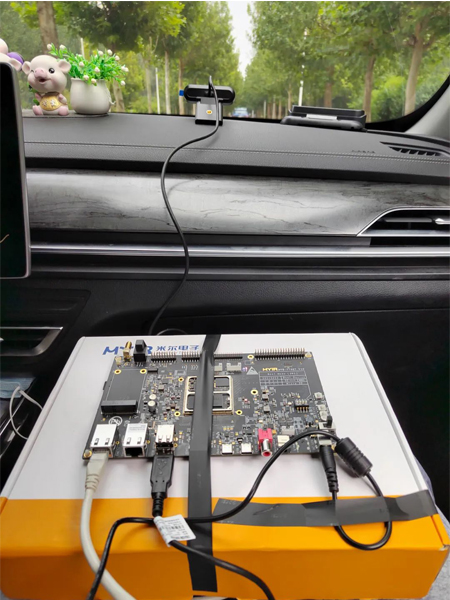
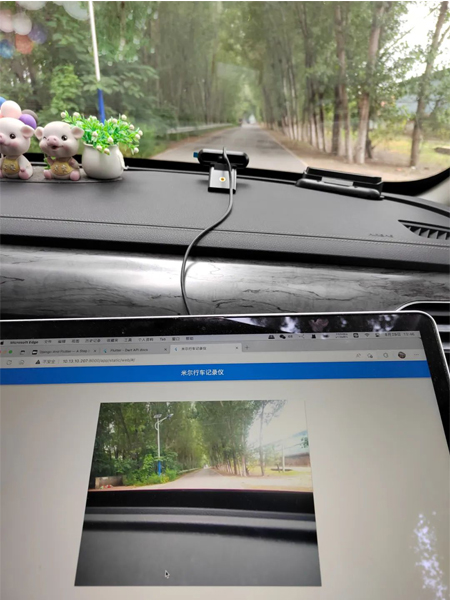
9. Vehicle test
After repeated testing and verification to ensure that all functions are complete, the on-board test was carried out.
10. Actual code description:
For complete code, please go through MYIR DASH CAM to get:
https://gitee.com/honestqiao/MYiR-Driving-Recorder
The code directory is described as follows:
DriveingRecorder: camera service
Back: RestFul service
Frontend: Flutter Web interface
In practical application, associate the data directory of video recording with the back-end static/data directory, so that they can be unified.
|