This user evaluation report is provided by “qinyunti” from EEWORLD. The test of the MYD-YT507H board is the operation record of the LED control through keys under the Linux C development environment.
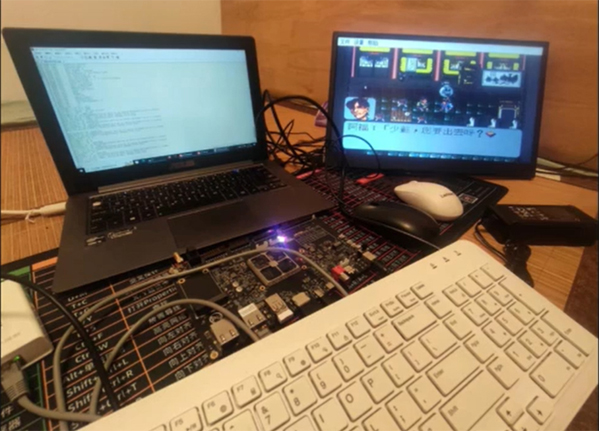
For the selection of SoM or development board, we will also consider the convenience of secondary development, development environment, usability and integrity of the manual. Let's start a simple experience on MYIR’s MYD-YT507H, an Allwinner T507-H MPU based ARM Cortex-A53 board with Linux C development. Here we are using WIN11 + WSL2 + Ubuntu 20.04 for development. I installed Ubuntu on drive E as it may require large space.
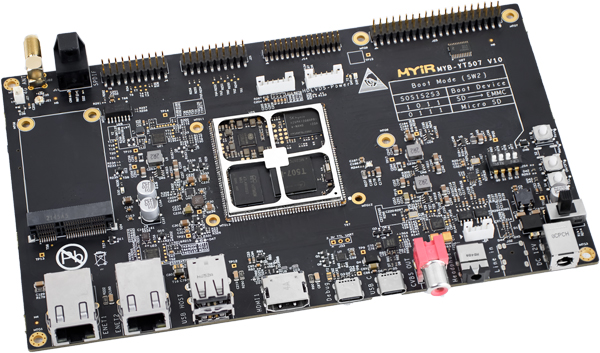
MYD-YT507H Development Board
Preparations
Login from Serial Port
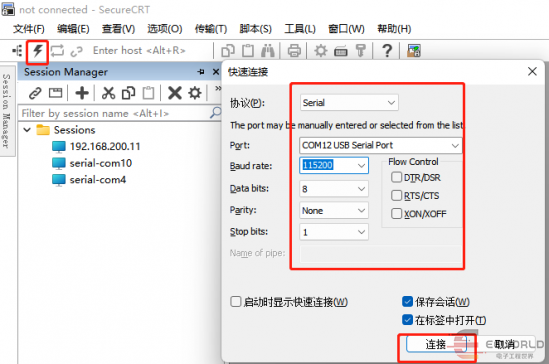
Connect the Debug USB Type-C interface of the MYD-YT507H board with the USB port of PC through one USB cable. Use CRT to set the serial port terminal. The parameters are 115200, 8, None and 1. If you could not find COM, please download the FTD21XX driver from internet and install. Then Login to the development board.
User name is root and no need password.
[root@myir:/]#
SSH login
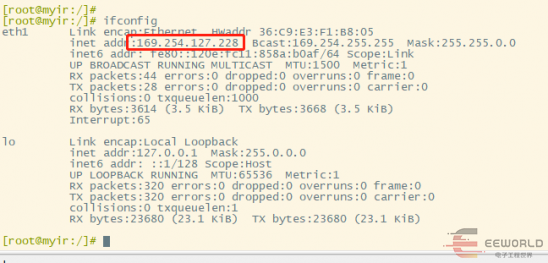
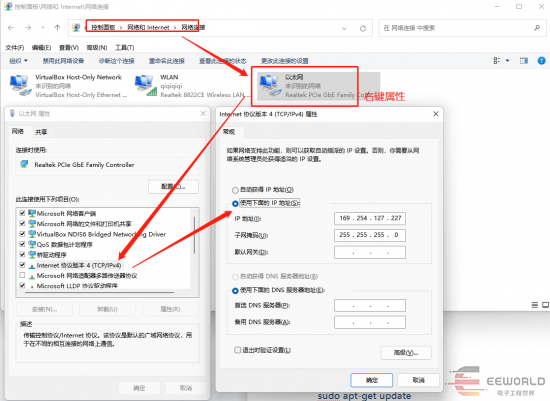
Connect the Ethernet (ENET2) Interface and check the IP from the serial terminal using ifconfig.
The IP address of the MYD-YT507H board is 169.254.127.228.
I set the IP address of my PC to the same network segment 169.254.127.227.
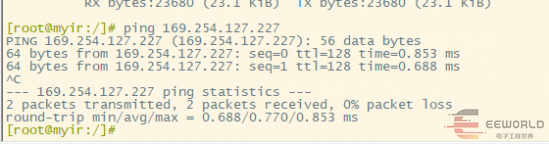
The MYD-YT507H board pings the PC.
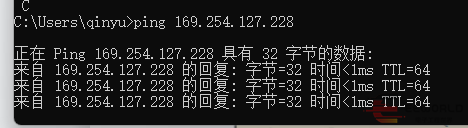
The PC pings the MYD-YT507H board.
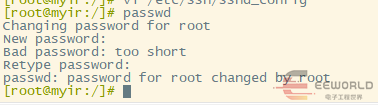
If the ping fails, turn off the computer's firewall. Modify the user password of root. Input passwd at serial terminal, enter and then input 123, enter again and input 123, the password will be changed to 123.
Use CRT SSH to login in.

The password is 123, which I just set.
Installation Required Package
Enter the WSL and open the terminal
sudo apt-get update
sudo apt-get install build-essential gcc libncurses5-dev bison flex texinfo
sudo apt-get install zlib1g-dev gettext libssl-dev autoconf
sudo apt-get install autoconf
sudo apt-get install automake
sudo apt-get install libtool
sudo apt-get install linux-libc-dev:i386
sudo apt-get install git
sudo apt-get install gnupg
sudo apt-get install flex
sudo apt-get install bison
sudo apt-get install gperf
sudo apt-get install build-essential
sudo apt-get install zip
sudo apt-get install curl
sudo apt-get install libc6-dev
sudo apt-get install libncurses5-dev:i386
sudo apt-get install x11proto-core-dev
sudo apt-get install libx11-dev:i386
sudo apt-get install libreadline6-dev:i386
sudo apt-get install libgl1-mesa-glx:i386
sudo apt-get install libgl1-mesa-dev
sudo apt-get install g++-multilib
sudo apt-get install mingw32
sudo apt-get install tofrodos
sudo apt-get install python-markdown
sudo apt-get install libxml2-utils
sudo apt-get install xsltproc
sudo apt-get install zlib1g-dev:i386
sudo apt-get install gawk
sudo apt-get install texinfo
sudo apt-get install gettext
sudo dpkg-reconfigure dash # select no
sudo ln -s /usr/lib/i386-linux-gnu/mesa/libGL.so.1 /usr/lib/i386-linux-gnu/libGL.so
sudo apt-get install zlib1g-dev # Install when missing libz.so
sudo apt-get install uboot-mkimage # Install or install u-boot-tools when missing mkimge
Cross-compile Environment Installation
The MYD-YT507H board comes with SDK. Decompress 03_Tools.zip;change the folder name Complie Toolchain to Complie_Toolchain under the path E:\BOARD\MYC-YT507\03_Tools. Because the file names in command lines in Linux cannot have spaces.
In wsl
cd ~
mkdir MYD-YT507H
cd MYD-YT507H/
Decompress the files under windows to WSL:
tar -xvf/mnt/e/BOARD/MYC-YT507/03_Tools/Complie_Toolchain/gcc-linaro-7.4.1-2019.02-x86_64_aarch64-linux-gnu.tar.xz -C.
export PATH=$PATH:~/MYD-YT507H/gcc-linaro-7.4.1-2019.02-x86_64_aarch64-linux-gnu/bin
aarch64-linux-gnu-gcc -v
If you could see the print information, the installation is successful.
Test
Edit code
The following codes are used to implement the key control of LED on and off.
led.c
#include <linux/input.h>
#include <sys/types.h>
#include <sys/stat.h>
#include <fcntl.h>
#include <sys/ioctl.h>
#include <stdio.h>
#include <stdlib.h>
#include <string.h>
#include <unistd.h>
/* ./key_led /dev/input/event0 noblock */
int main(int argc, char **argv)
{
int fd,bg_fd; int err, len, i;
unsigned char flag;
unsigned int data[1];
char *bg = "/sys/class/leds/blue/brightness";
struct input_event event;
if (argc < 2)
{
printf("Usage: %s <dev> [noblock]\n", argv[0]);
return -1;
}
if (argc == 3 && !strcmp(argv[2], "noblock"))
{
fd = open(argv[1], O_RDWR | O_NONBLOCK);
}
else
{
fd = open(argv[1], O_RDWR);
}
if (fd < 0)
{
printf("open %s err\n", argv[1]);
return -1;
}
while (1)
{
len = read(fd, &event, sizeof(event));
if (event.type == EV_KEY)
{
if (event.value == 1)//key down and up
{
printf("key test \n");
bg_fd = open(bg, O_RDWR);
if (bg_fd < 0)
{
printf("open %d err\n", bg_fd);
return -1;
}
read(bg_fd,&flag,1);
if(flag == '0')
system("echo 1 > /sys/class/leds/blue/brightness"); //l ed off - 62 -
else system("echo 0 > /sys/class/leds/blue/brightness ");//led on
}
}
}
return 0;
}
Compile
aarch64-linux-gnu-gcc led.c -o led
Import to the Development Board
Copy the compiled program led to windows. Then copy it to the development board.
cp led /mnt/e
After SSH login, input rz and enter to select file led. Click Add and Confirm.
Run
chmod +x led./led /dev/input/event1 noblock
Press ON/OFF key on the MYD-YT507H development board , the blue LED will be on and off.
MYIR has provided detailed manuals and software package for the MYD-YT507H development board to help users to quickly familiar with the development environment for secondary development.
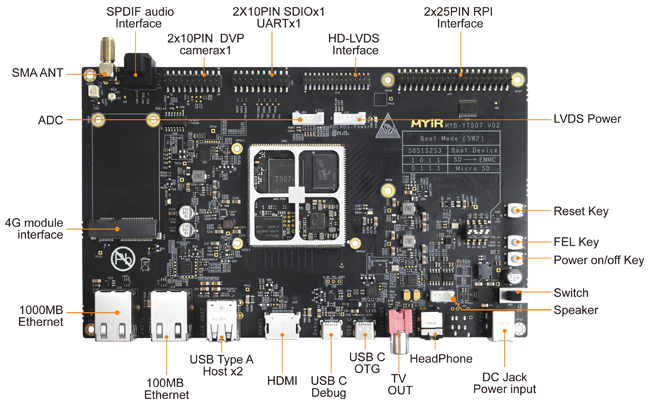
MYD-YT507H Development Board Top-view (delivered with shieldinig cover by default)
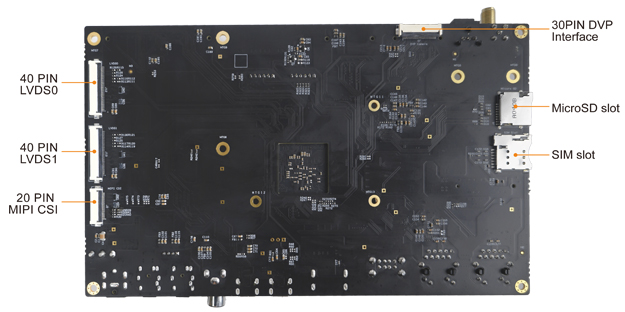
MYD-YT507H Development Board Bottom-view
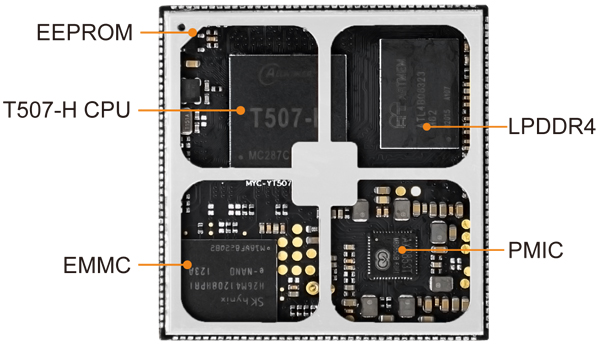
MYC-YT507H CPU Module (delivered with shieldinig cover by default)
|